Remote visualization with DCV
CCME provides multiple ways of accessing remote graphical sessions to run you pre and post-processing
workloads.
Remote visualization is delivered by the DCV software.
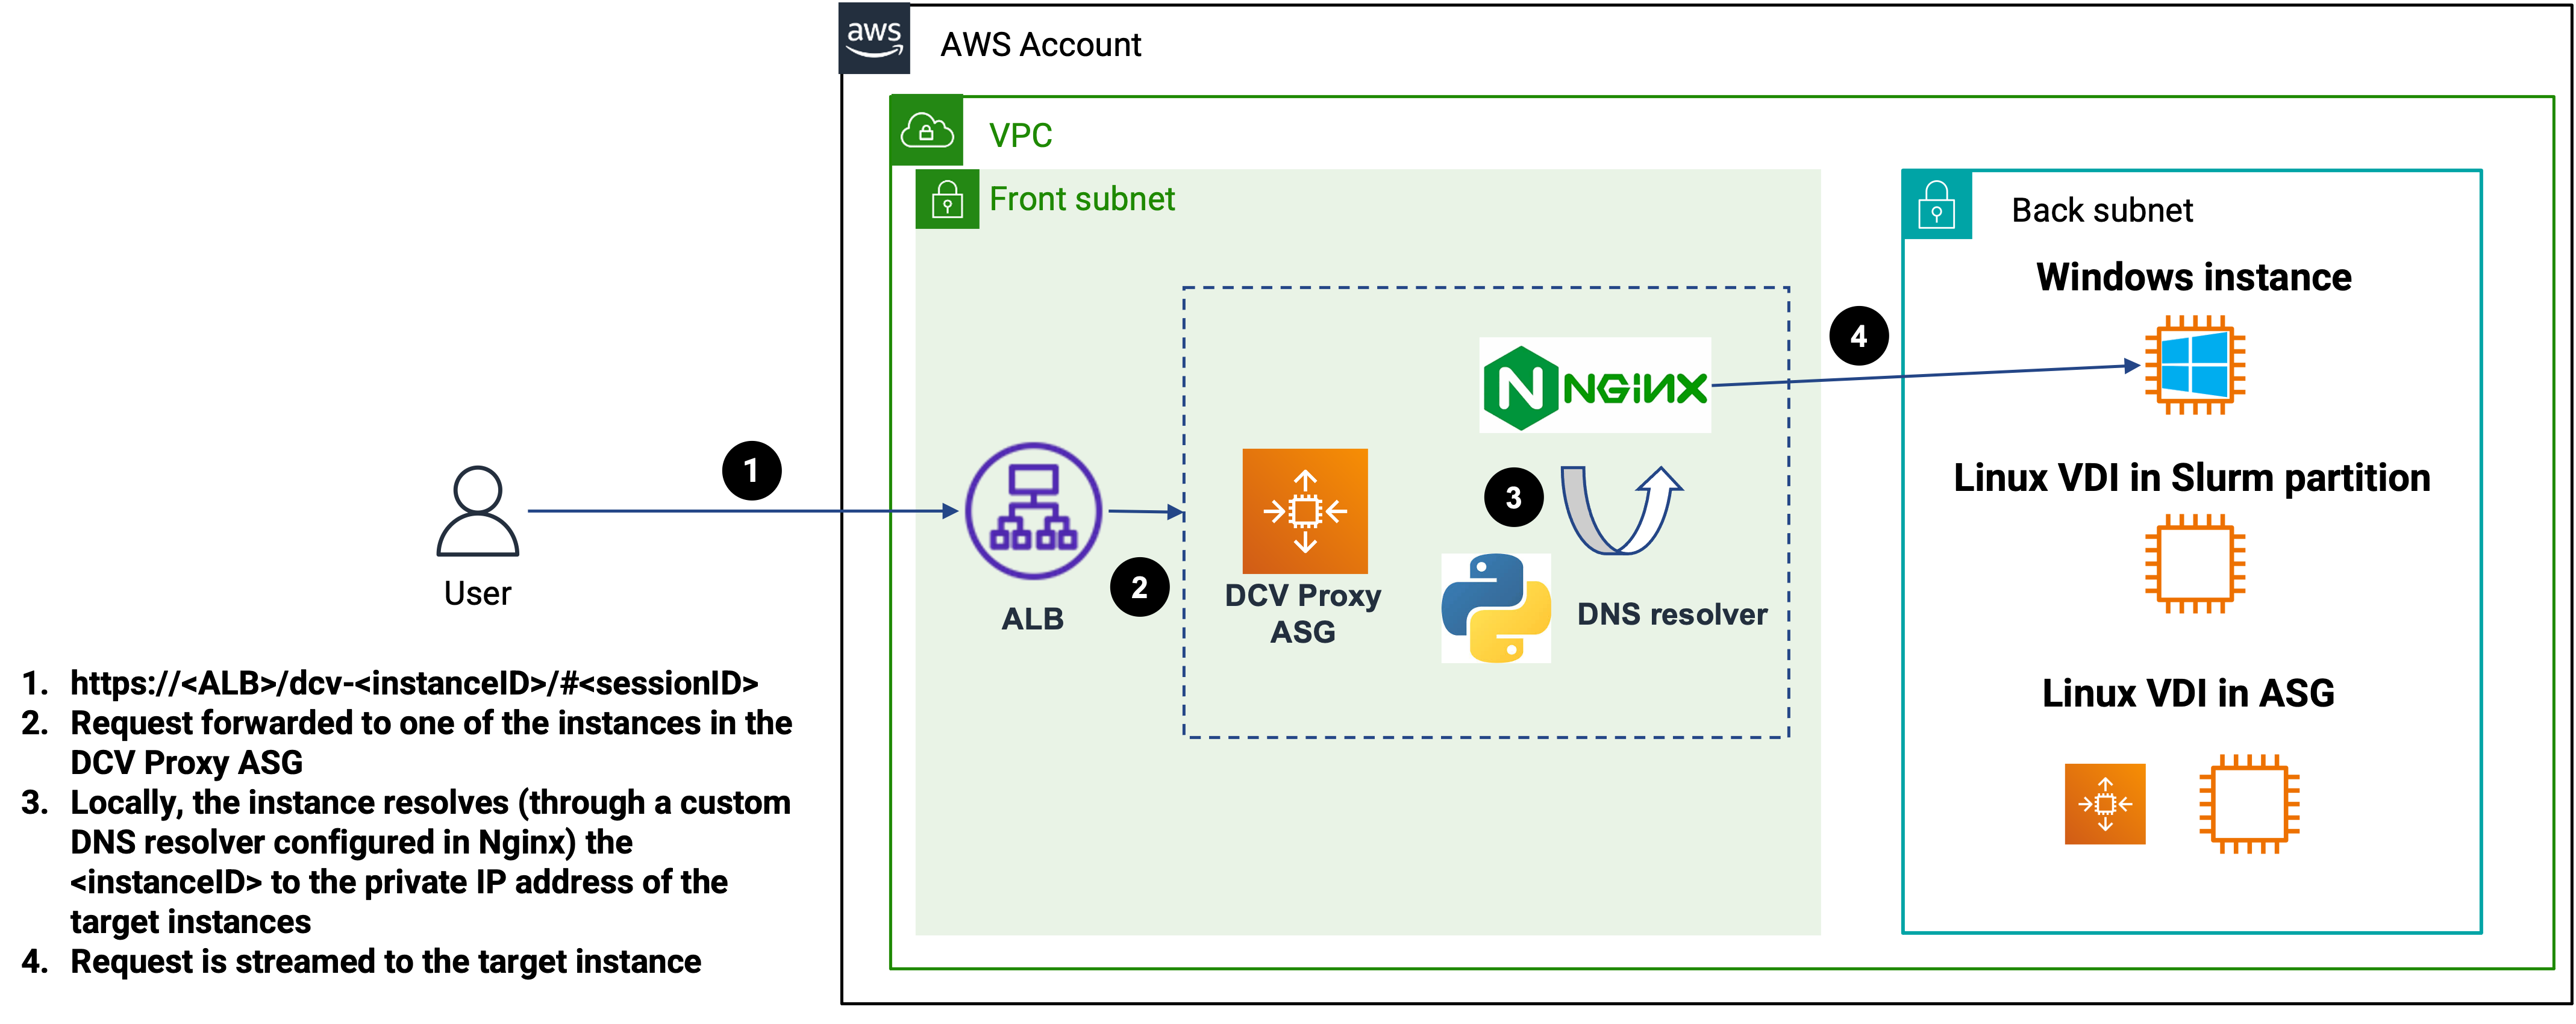
All DCV sessions are made available through the ALB deployed as part of the Cluster Management Host stack.
The URL to reach them will be https://ALB_URL/dcv-INSTANCE_ID/#SESSION_ID, with:
ALB_URL: the DNS name of the ALB orCCME_DNSif you specify itINSTANCE_ID: the ID of the EC2 instance on which the session runsSESSION_ID: the DCV session ID
By default, only 1 session is allowed per user on each type of DCV sessions (see below: HeadNode, in a dcv* partition or a Windows instance).
If a user tries to create multiple sessions, he will get a prompt asking “Do you want to reconnect to the existing session?”.
This limitation can be changed by updating the corresponding EnginFrame service: in EnginFrame “Admin Portal”,
go to “Manage/Services” and edit the selected DCV service, click on “Settings” and change the “Max number of Sessions” parameter
(you can also change the “Session Class” if you wish for example to set the same value for all DCV sessions to allow only 1
DCV session across all the DCV services).
Note
If you modify one of the EnginFrame DCV services generated by CCME, then be aware that the next time you
run a pcluster update-cluster these services will be regenerated by CCME. You can safely publish
unmodified DCV services, but if you need to customize them, we recommend to first create a copy of the
services, and the customize and publish these copies.
All sessions are served through the ALB, and in order to circumvent the limitations on the number of target groups an ALB can have (hard limit to 100), the CMH stack also deploys a fleet of “DCV Proxies”: this is an Autoscaling Group (ASG) where each instance hosts an Nginx server acting as a reverse proxy for the DCV sessions.
Prerequisites
You need to check the limits of your AWS account to match your needs in terms of remote visualization. We list below the quotas you need to review and ensure that they are high enough to support your use cases:
EC2: ensure that you have enough vCPUs for the different types of instances you will use across all your clusters.
Linux
Headnode
A service in EnginFrame is available to start a DCV session on the HeadNode.
Its name is DCV Linux - Headnode, by default it is not published to any user.
DCV session on the HeadNode is not managed by Slurm, but by DCV Session Manager (DCVSM).
The instance is tagged in DCVSM CCME_type="linux_headnode"
Compute nodes
All instances placed in a Slurm partitions named dcv* will have DCV installed and available.
A service in EnginFrame automatically created to start a DCV session on the each dcv* queue.
The name of the services is DCV Linux - queue <queueName> (with queueName the name of the DCV queue), by default it is not published to any user.
If you wish to automatically terminate DCV sessions that do not have any activity during a given duration, you can
specify the CCME_LIN_INACTIVE_SESSION_TIME configuration variable to specify this duration in seconds.
CCME_LIN_INACTIVE_SESSION_TIME can be specified:
in the ParallelCluster configuration file in
HeadNode.CustomActions.OnNodeUpdated.Args: the parameter is applied to all Linux DCV services.in the
DCV Linux - queue <queueName>service in EnginFrame: the parameter is applied only to this service, and overrides the value that could have been set inHeadNode.CustomActions.OnNodeUpdated.Args.
CCME_LIN_INACTIVE_SESSION_TIME has a default value of 0, meaning that the DCV session is never automatically terminated.
Nodes are managed by Slurm and ParallelCluster as standard compute nodes. So instances are dynamically started/terminated depending on the needs of the users, and DCV sessions are managed as Slurm jobs (thus benefiting from Slurm scheduling, job management and accounting capabilities).
If you want to modify the size of your “DCV fleet”, you need to update the dcv* partitions in AWS ParallelCluster
configuration file, and then update the cluster. For example, you can update the number of static nodes in the
partition by updating the MinCount
parameter.
Warning
If you decrease the size of your partition, especially if you decrease the MinCount parameter, be
aware that AWS ParallelCluster will remove nodes based on their “position” in the nodes list,
regardless of whether a DCV session (a slurm job) runs on the nodes.
See
Cluster capacity size and update
for more details.
Autoscaling fleet
If you want to have more flexibility, and be able to scale in/out the number of instances available in your compute fleet, while also accelerating DCV sessions start time, you can also define Linux DCV autoscaling fleets.
Instances launched as part of a Linux DCV autoscaling fleet are not Slurm compute nodes, but they can be used as client to the Slurm cluster to submit, monitor and manage jobs. Also, all shared filesystems mounted on the cluster are also automatically mounted on the instances, thus allowing users to directly access their Homes, scratch/data/project directories/filesystems.
Configuration
Linux DCV autoscaling fleets are managed through the CCME_LIN_* configuration variables.
Global configuration for all DCV ASGs
CCME_LIN_SG: A CSV list of security groups (a single SG can be provided)CCME_LIN_ASG_SUBNETS: A CSV list of subnets in which to deploy the instances (a single subnet can be provided)CCME_LIN_AMI: The AMI to use with the Linux DCV fleet instances, it must be an AMI baked with CCME (or at least AWS ParallelCluster).Warning
The AMI you use with
CCME_LIN_AMImust be of the same OS type and version as the AWS ParallelCluster Image.Os parameter. For example, if you specifyImage.Os: rhel9, make sure thatCCME_LIN_AMIis an AMI based on RHEL 9.CCME_LIN_BOOTSTRAP_TIMEOUT: The bootstrap timeout for launching Linux DCV nodes.CCME_LIN_INSTANCE_PROFILE: The ARN of the Instance profile to use on the instances (must be theccme_cluster_compute_instance_profileparameter of the CMH stack or theComputeNodeInstanceProfileSlurmoutput of the CRS stack)CCME_LIN_DEFAULT_TIMELIMITandCCME_LIN_MAX_TIMELIMIT:Respectively the default time limit for a DCV session before it is automatically closed, and the maximum time limit allowed.
If
CCME_LIN_DEFAULT_TIMELIMITequals0, then the sessions do not have a timelimit, and will need to be manually closed.A user can override the current time limit by using the
dcv-timeoutcommand, but he cannot specify a time limit greater thanCCME_LIN_MAX_TIMELIMIT.
Configuration to define each ASG. Each of the following parameters are CSV lists that must contain the same number of values
CCME_LIN_ASG_INST_TYPES: list of instance types. Each one will get its own Autoscaling Group (ASG).CCME_LIN_ASG_MIN: list of minimum number of instances (integers).CCME_LIN_ASG_DES: list of initial desired number of instances (integers). This parameter is the initial value, it will be overridden by the scaling algorithm.CCME_LIN_ASG_MAX: list of maximum number of instances (integers).CCME_LIN_WARM_POOL: list of Booleans to activate or not the warm pool on the ASGs.CCME_LIN_BUFFER_SIZE: list of integers to specify the buffer size (number of instances to keep ready on top of the ones used by running DCV sessions).
Linux ASG session lifecycle
Creation/Deletion
DCV fleets are created with a CCME cluster. They follow the same lifecycle as your cluster:
Launch template (LT) and auto scaling groups (ASG) are created/updated when the cluster is created/updated. 1 ASG and 1 LT are created for each instance type in
CCME_LIN_ASG_INST_TYPES. If you add, modify or remove values inCCME_LIN_ASG_INST_TYPES(and associated variables) during a cluster update, the LT and ASG will be updated accordingly (potentially deleted).EC2 instances part of the ASG, the LT and ASG are deleted when the cluster id deleted.
These actions are conducted by a Lambda that is part of the CMH stack. The lambda is triggered by an SNS message sent by the Headnode as part of its configuration process, and by the deletion of the CloudFormation stack of the cluster. So when the cluster is terminated, all resources associated with the DCV fleet are deleted as well.

All services deployed by the Lambda are tagged with the tags defined in the Tags section of the AWS ParallelCluster
configuration file (see Tags section).
Two additional tags are also set: ccme:asg = LinuxDCV and parallelcluster:cluster-name = <clustername>.
DCV session management
DCV sessions in DCV fleets are managed through DCV Session Manager (DCVSM). The DCVSM agent is configured
on each DCV instance to join the DCVSM broker on the Headnode, and receives a list of tags that allows
to differentiate between all instances across the DCV fleets of the cluster:
CCME_clustername="<clustername>" and CCME_type="linux_asg_<instance type>".
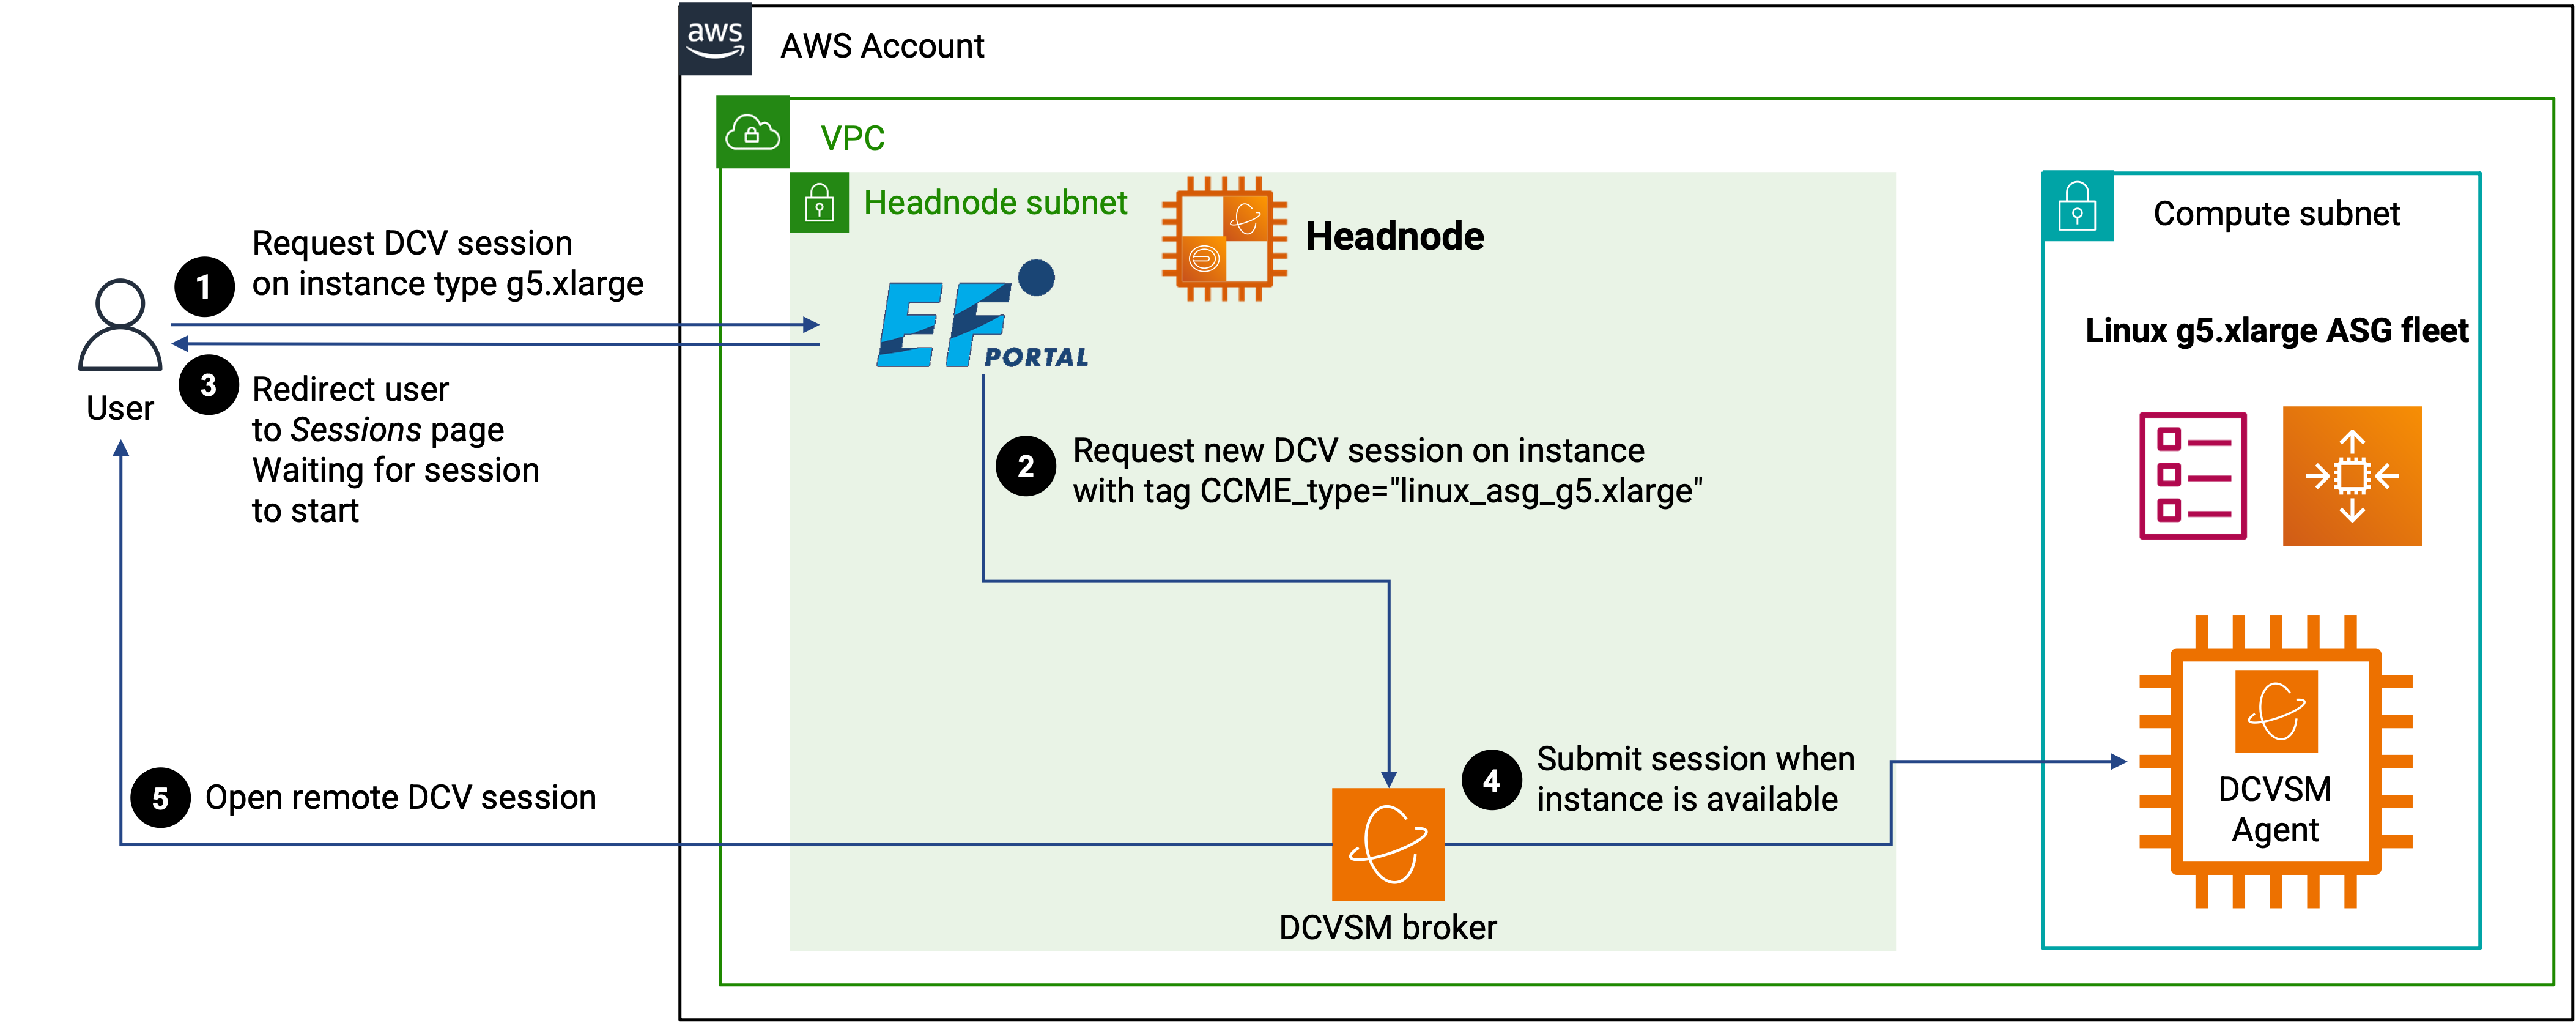
In EnginFrame/EF Portal a service is automatically created for each DCV fleet (each instance type)
named DCV Linux - asg <instance type>. They use the above defined tags to submit the session on
targeted instances types through DCVSM session requirements.
Only 1 session can be created on each instance: they are not shared between users during a session, though they can be used by multiple users one at a time.
Important
With EnginFrame, the DCV sessions submitted through DCVSM are not enqueued: either resources are available and the session starts, or they are not available and the session will fail.
With EFPortal, the DCV sessions are automatically enqueued in DCVSM and will wait for resources to be available. This allows the scaling algorithm to provision new instances for sessions in queue, while with EnginFrame you must preprovision the correct number of resources in your fleets.
The DCV sessions are also monitored by a daemon to check if their duration do not exceed the configured
time limit (see CCME_LIN_DEFAULT_TIMELIMIT and CCME_LIN_MAX_TIMELIMIT). If a session reaches
its time limit, it is automatically closed. The dcv-timeout command allows a user who is connected
on an instance running a DCV session to:
retrieve the current time limit of his session
$> dcv-timeout get --help
usage: dcv-timeout get [-h] --sessionid SESSIONID

Get current DCV session timeout

optional arguments:
  -h, --help            show this help message and exit
  --sessionid SESSIONID, -id SESSIONID
                        DCV session ID (default: None)
update the timelimit of his session (only if the user is the owner of the session or root)
$> dcv-timeout set --help
usage: dcv-timeout set [-h] --timelimit TIMELIMIT --sessionid SESSIONID

Update DCV session timeout

optional arguments:
  -h, --help            show this help message and exit
  --timelimit TIMELIMIT, -t TIMELIMIT
                        New time limit for the session (in minutes) (default: None)
  --sessionid SESSIONID, -id SESSIONID
                        DCV session ID (default: None)
When dcv-timeout is run from a DCV session, the SESSIONID is automatically retrieved from the environment variable DCV_SESSION_ID.
Fleet scaling
The ASG fleet size is manage by multiple elements.
The first one is the configuration that is specified in the AWS ParallelCluster configuration file and managed by the CCME_LIN_* variables (see Configuration). They control the initial size of the cluster : min, desired and max number of instances per ASG.
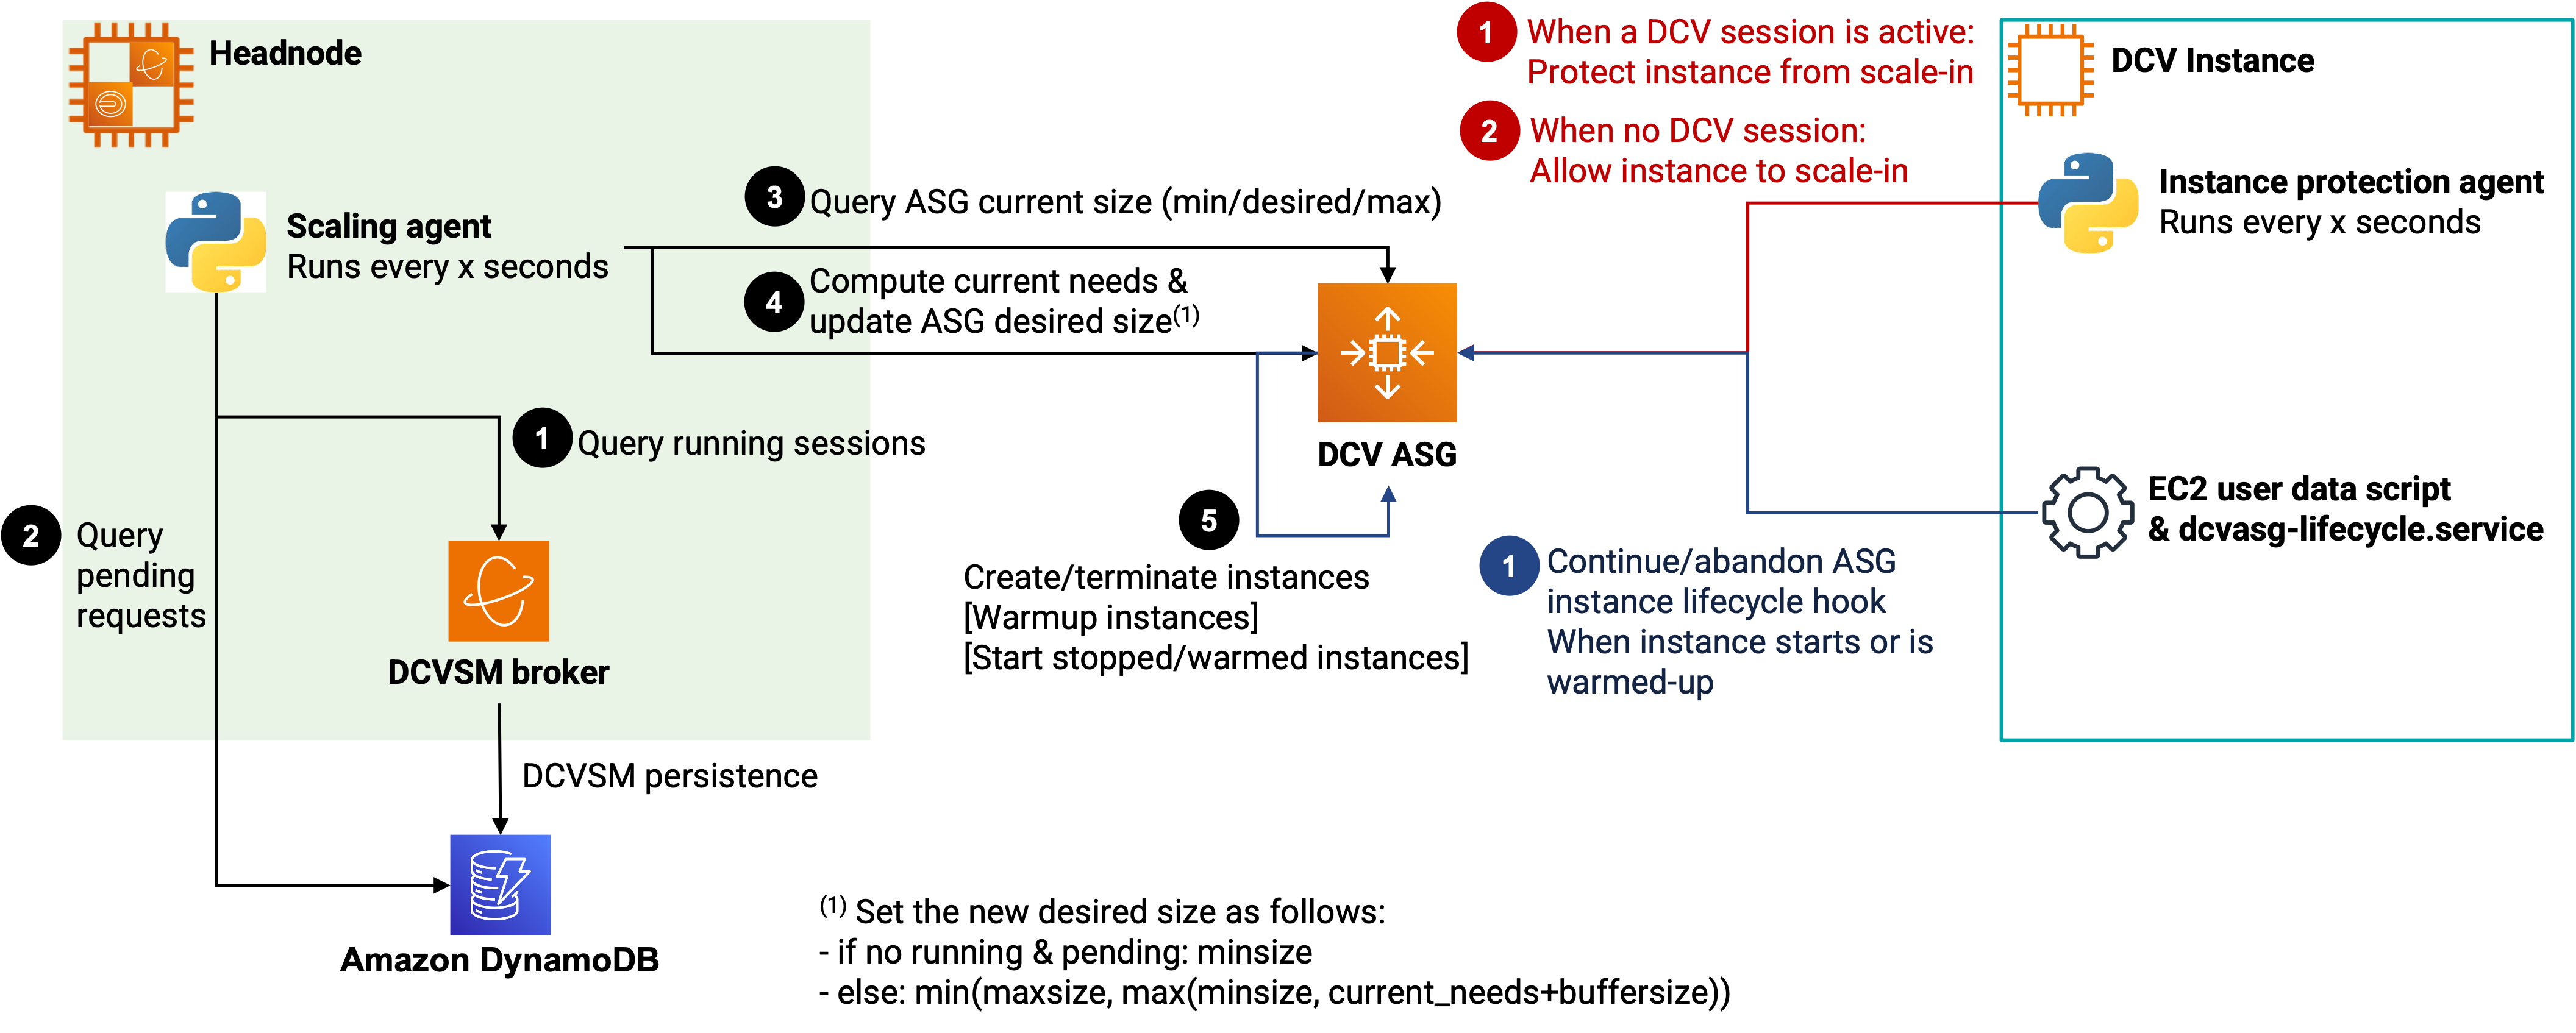
Once an ASG is deployed, it is periodically monitored by a daemon running on the headnode. This daemon queries both DCVSM (broker and its associated DynamoDB tables) to retrieve current needs (running DCV sessions, and pending requests), and the ASG to get the current parameters. If the need is greater than the current fleet size (desired number of instances), the the ASG is scaled-out, otherwise it is scaled-in (in both cases within the limits imposed by min and max size). It also takes into account a “buffer” that can be specified to always keep x instances up on top of the current number of running DCV sessions.
In order to speed up the scale-out phase, it is possible to activate a warm pool in the ASG. A warm pool pre-provisions instances in the instances, and lets them run their initialization scripts, before being stopped. When new instances are needed during a scale-out phase, they are preferentially taken from the warm pool and “woken-up” (started), thus leading to a much faster start time (e.g., going from ~8-10 minutes of start time to less than 30s). There is an extra cost of having warm pools, but it is just the price of the stopped instance (thus EBS volume storage), while providing even greater flexibility and improved start times. When a warm pool is activated, maxsize - desiredsize number of instances are pre-provisioned in the warm pool. CCME uses ASG lifecycle hooks to control the status of an instance in the ASG and ensure that it joins the DCVSM cluster only when not warming up.
Finally, on the instances, a daemon periodically checks if a DCV session is active. If yes, it protects the instance
from scaling-in in the ASG. This allows to modify the size of the ASG without impacting already running
sessions: the ASG won’t be able to terminate the instance for as long as there is an DCV session running on it.
This mechanism provides a greater flexibility than using DCV sessions as part of the Slurm compute nodes in
a dcv* partition.
Windows
Aside from Linux remote visualization nodes, CCME provides a way to dynamically manage Windows instances for remote visualization. In this case, the instances are note managed by Slurm and ParallelCluster, but directly by CCME through multiple mechanisms, but essentially a new EnginFrame plugin that manages the lifecycle of the Windows instances along with the requested remote sessions.
Prerequisites
The only prerequisite that is needed to setup a Windows DCV fleet, is to have an AMI prepared with the following requirements:
OS version: Windows Server 2019 or greater
Installed software
DCV server: configured to work properly on the target instance type (e.g., with or without GPU), and with DCV Session Manager.
DCV Session Manager Agent (DCVSM Agent). Its final configuration will be done at startup by CCME through an EC2 User-Data script.
NVidia drivers: this is optional and depends on the target instance type.
Warning
Take care to install the right version of NVidia drivers depending on your version of Windows. For example, GRID 17.0 and later do not support Windows Server 2019, so you’ll need to download the version that supports your OS. For example, for Windows Server 2019, you can use GRID 16.6, which is the latest supported version:
$Bucket = "ec2-windows-nvidia-drivers"
# Change $KeyPrefix to match the version you want to install, or use "latest" if it supports your version of Windows
$KeyPrefix = "grid-16.6"
$LocalPath = "$home\Desktop\NVIDIA"
$Objects = Get-S3Object -BucketName $Bucket -KeyPrefix $KeyPrefix -Region us-east-1
foreach ($Object in $Objects) {
$LocalFileName = $Object.Key
  if ($LocalFileName -ne '' -and $Object.Size -ne 0) {
      $LocalFilePath = Join-Path $LocalPath $LocalFileName
      Copy-S3Object -BucketName $Bucket -Key $Object.Key -LocalFile $LocalFilePath -Region us-east-1
  }
}
AWSPowerShell: tools to call AWS APIs. Note that these tools are installed by default on AWS standard Windows AMIs.
AWS Tools for Powershell: CCME uses the
AWS.Tools*modules, which are the most recents tools to interact with AWS in PowerShell. The complete documentation to install them are available on Install AWS.Tools on Windows and here is in summary what you need to do (note the-AllowClobberoption that allows you to overwrite any potential existing older installation such asAWSPowerShell.NetCorewhich are less efficient), we only need 2 modules,AWS.Tools.SimpleNotificationServiceandAWS.Tools.S3:Install-Module -Name AWS.Tools.Installer -Force Install-AWSToolsModule AWS.Tools.SimpleNotificationService,AWS.Tools.S3 -CleanUp -Scope AllUsers -AllowClobber
User authentication: your AMI must be configured to authenticate against your Active Directory, or use local users (not recommended)
Shared file systems: any shared file systems that needs to be mounted on the instance must be pre-configured in the AMI. CCME EC2 User-Data script currently do not handle any dynamic mountpoints.
You’ll then need to select an instance type compatible with the AMI you created.
Warning
Do not forget to run Sysprep (see this doc) before generating your AMI, and ensure that EC2 user data will be executed when a new instance launches.
Note
Read also this section to apply good practices to reduce start time of your Windows instances.
Configuration
To configure CCME, you’ll need to update the following variables in the ParallelCluster configuration file,
in the HeadNode.CustomActions.OnNodeUpdated.Args parameters:
Instance launch configuration:
CCME_WIN_AMI: the AMI ID.CCME_WIN_INSTANCE_TYPE: the instance type to use.CCME_WIN_TAGS(optional, default{}): dictionary of additional tags to apply on the instances of the Windows fleet (see Starting a Windows DCV session for the list of default tags). The format must be a valid “YAML dictionary embedded in a string”. Hence, the whole line must be enclosed in double quotes, and then the value ofCCME_WIN_TAGSmust be the dict enclosed in escaped double quotes. See the following example:"CCME_WIN_TAGS=\"{'MyTagKey1': 'MyTagValue1', 'MyTagKey2': 'MyTagValue2'}\"".CCME_WIN_CUSTOM_CONF_REBOOT(optional, defaultfalse): you need to set this totrueif your Powershell customization scriptwinec2_config.ps1reboots the instance.
Session launch monitoring from EnginFrame:
CCME_WIN_LAUNCH_TRIGGER_DELAY(optional, default10): Specify the delay (in seconds) between two rounds performed by an EnginFrame trigger to check if the instance has started and if the DCVSM agent on the instance has registered to the DCVSM broker on theHeadNode.CCME_WIN_LAUNCH_TRIGGER_MAX_ROUNDS(optional, default100): Maximum number of rounds allowed to check the instance startup (hence, the maximum delay for an instance to start and join DCVSM isCCME_WIN_LAUNCH_TRIGGER_DELAY * CCME_WIN_LAUNCH_TRIGGER_MAX_ROUNDS, by default10 * 100 = 1000seconds)
Session cleanup configuration:
CCME_WIN_INACTIVE_SESSION_TIME(optional, default600): the instance is terminated if no DCV session is active on the Windows instance since more thanCCME_WIN_INACTIVE_SESSION_TIMEseconds. If the value is0, this control is deactivated.CCME_WIN_NO_SESSION_TIME(optional, default600): the instance is terminated if no DCV session is up and running on the Windows instance and the instance has been started more thanCCME_WIN_NO_SESSION_TIMEseconds ago. If the value is0, this control is deactivated.CCME_WIN_NO_BROKER_COMMUNICATION_TIME(optional, default600): time in seconds after which the instance is terminated if the DCVSM broker on the headnode cannot be contacted from the Windows instance. If the value is0, this control is deactivated.
Note
If you need to have multiple configurations for your Windows interactive sessions in a single CCME cluster,
you can override the values of CCME_WIN_AMI, CCME_WIN_INSTANCE_TYPE, CCME_WIN_INACTIVE_SESSION_TIME,
CCME_WIN_NO_SESSION_TIME and CCME_WIN_NO_BROKER_COMMUNICATION_TIME that you have set in ParallelCluster
configuration by exporting these variables with the expected values in the action script of your EnginFrame services
(e.g., export CCME_WIN_INSTANCE_TYPE=g4dn.xlarge).
In this case, the variables set in ParallelCluster configuration file will be used as default values, and the variables set in EnginFrame services will be specific to the service.
You can thus create multiple DCV Windows services with different configurations. For example:
Allow long-lasting sessions by setting
CCME_WIN_INACTIVE_SESSION_TIMEto0.Propose multiple sizes of instances depending on the application/use-case your users have (e.g.,
g4dn.12xlargefor heavy 3D modeling,m6a.largefor 2D-only sessions…).
Note
If you need to update the AMI for your Windows instances (e.g., to applying a security update), you have two ways of doing it:
Simply export the
CCME_WIN_AMIin the DCV services in EnginFrame, by specifying the new AMI ID. You will need to exporte this variable for all Windows DCV services if you have multiple.Update the
CCME_WIN_AMIvariable in the ParallelCluster configuration file. For that, you will need to stop the compute fleet of your cluster, then update the cluster, and start again the compute fleet.
Windows session lifecycle
Starting a Windows DCV session
To create a Windows DCV session, you first need to publish the DCV Windows service that is automatically created
with in EnginFrame.
Just log-in as an administrator (e.g., efadmin), click on Switch to Admin View and then on Services,
select the DCV Windows service and Publish the service to the selected groups of users.
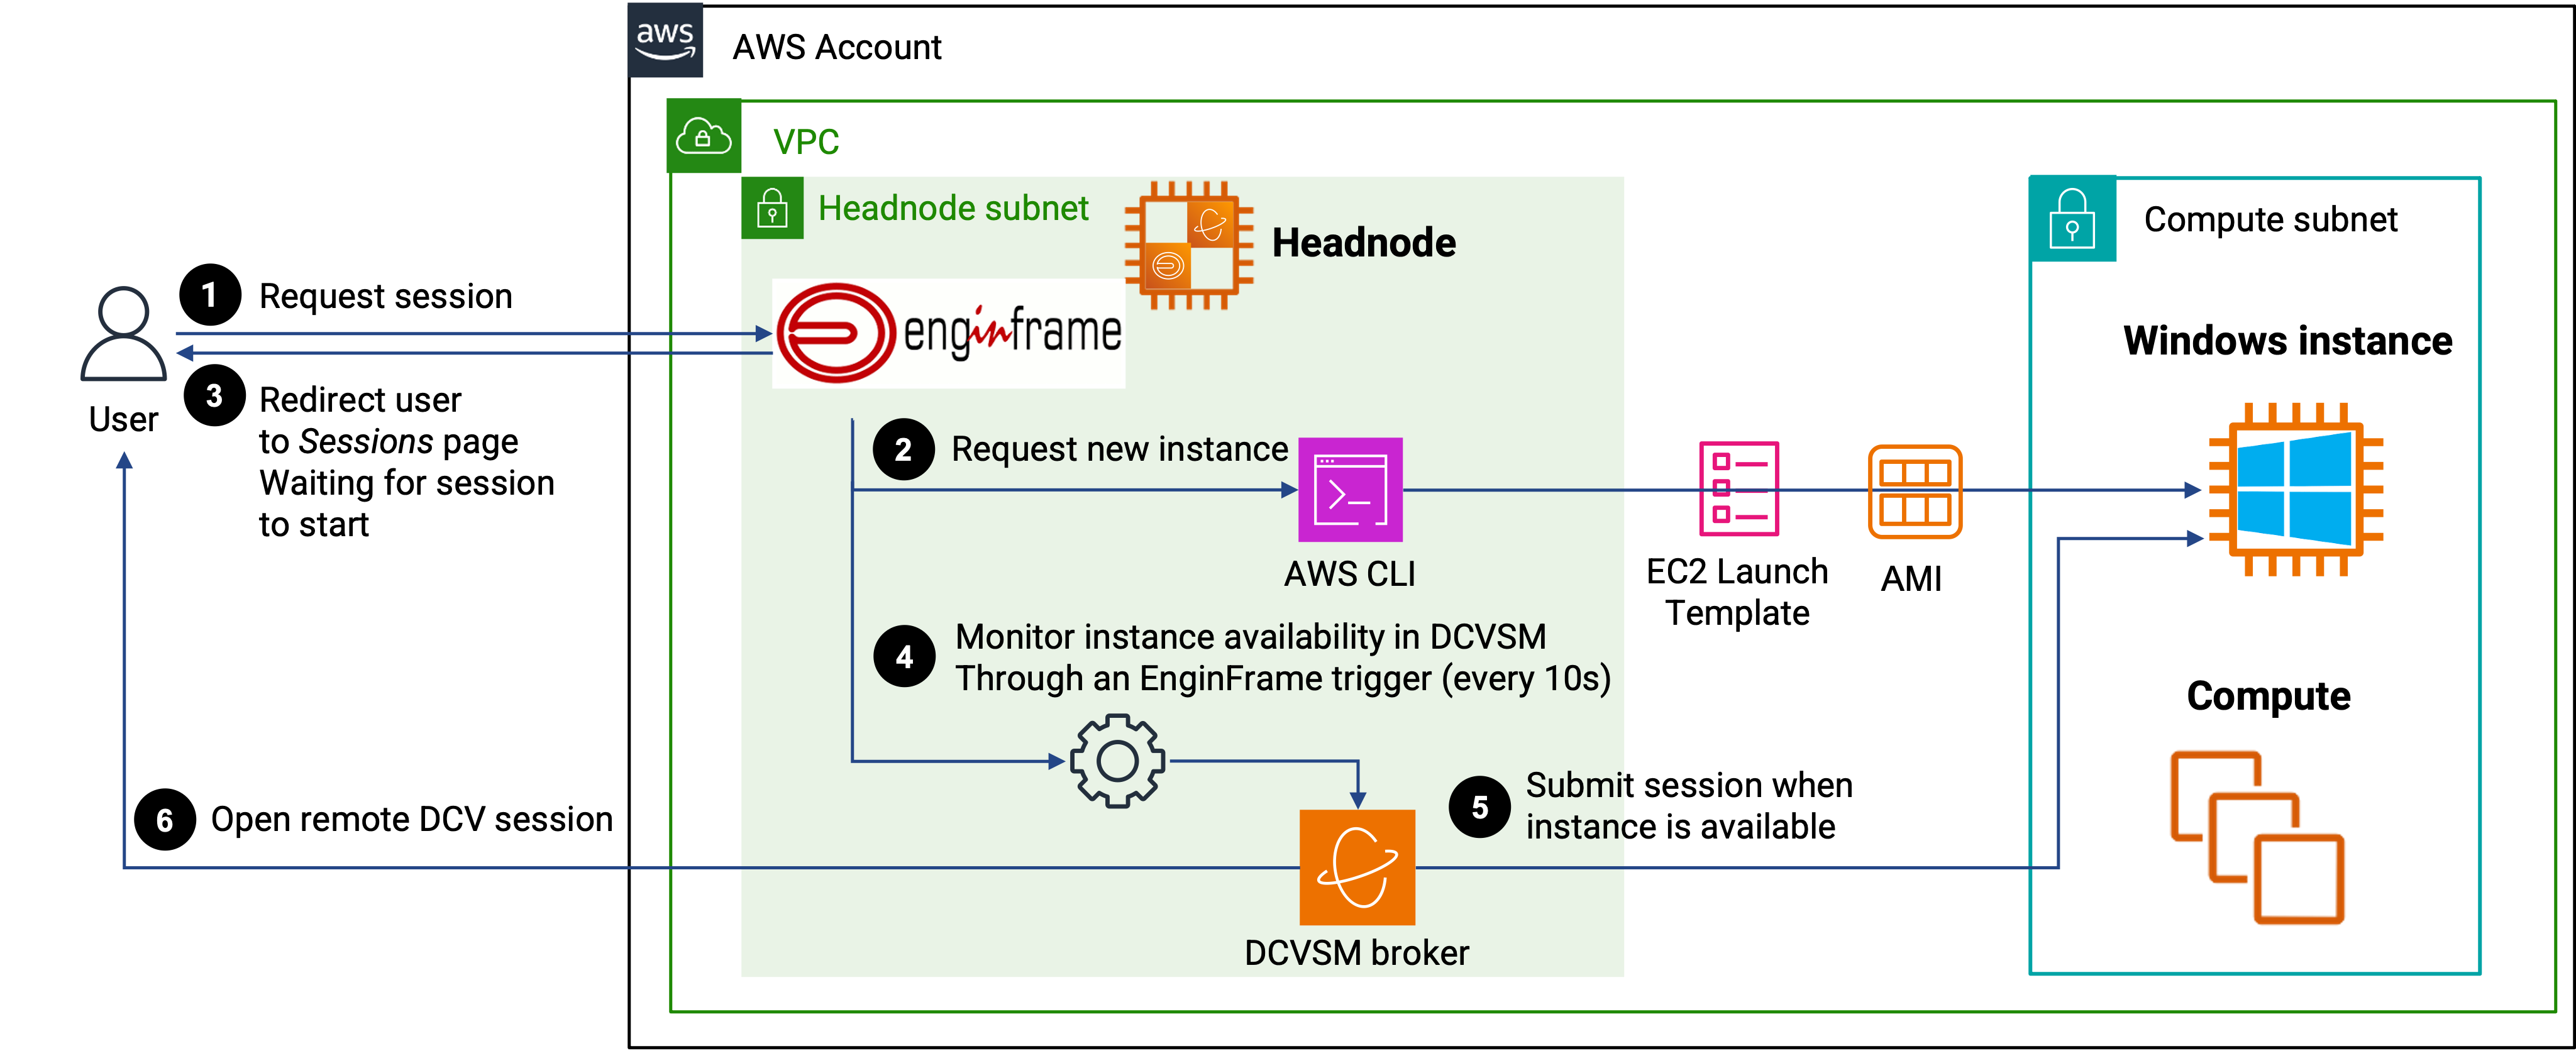
Whenever a user requests a new Windows session through the DCV Windows service created above, it will go through the following process:
A new EC2 instance is launched.
Each session is tied to a specific EC2 instance: it is started when requested and terminated when the session is closed (see Terminating a DCV session and instance cleanup to prevent overspendings for details about EC2 instance termination).
The instance is launched with a Launch Template created by the Management Host (see the
CCME_WIN_LAUNCH_TEMPLATE_IDparameter in the ParallelCluster configuration file inHeadNode.CustomActions.OnNodeUpdated.Args), it will be started in the same network as the compute nodes.The AMI ID used to launch the instance is the one specified by
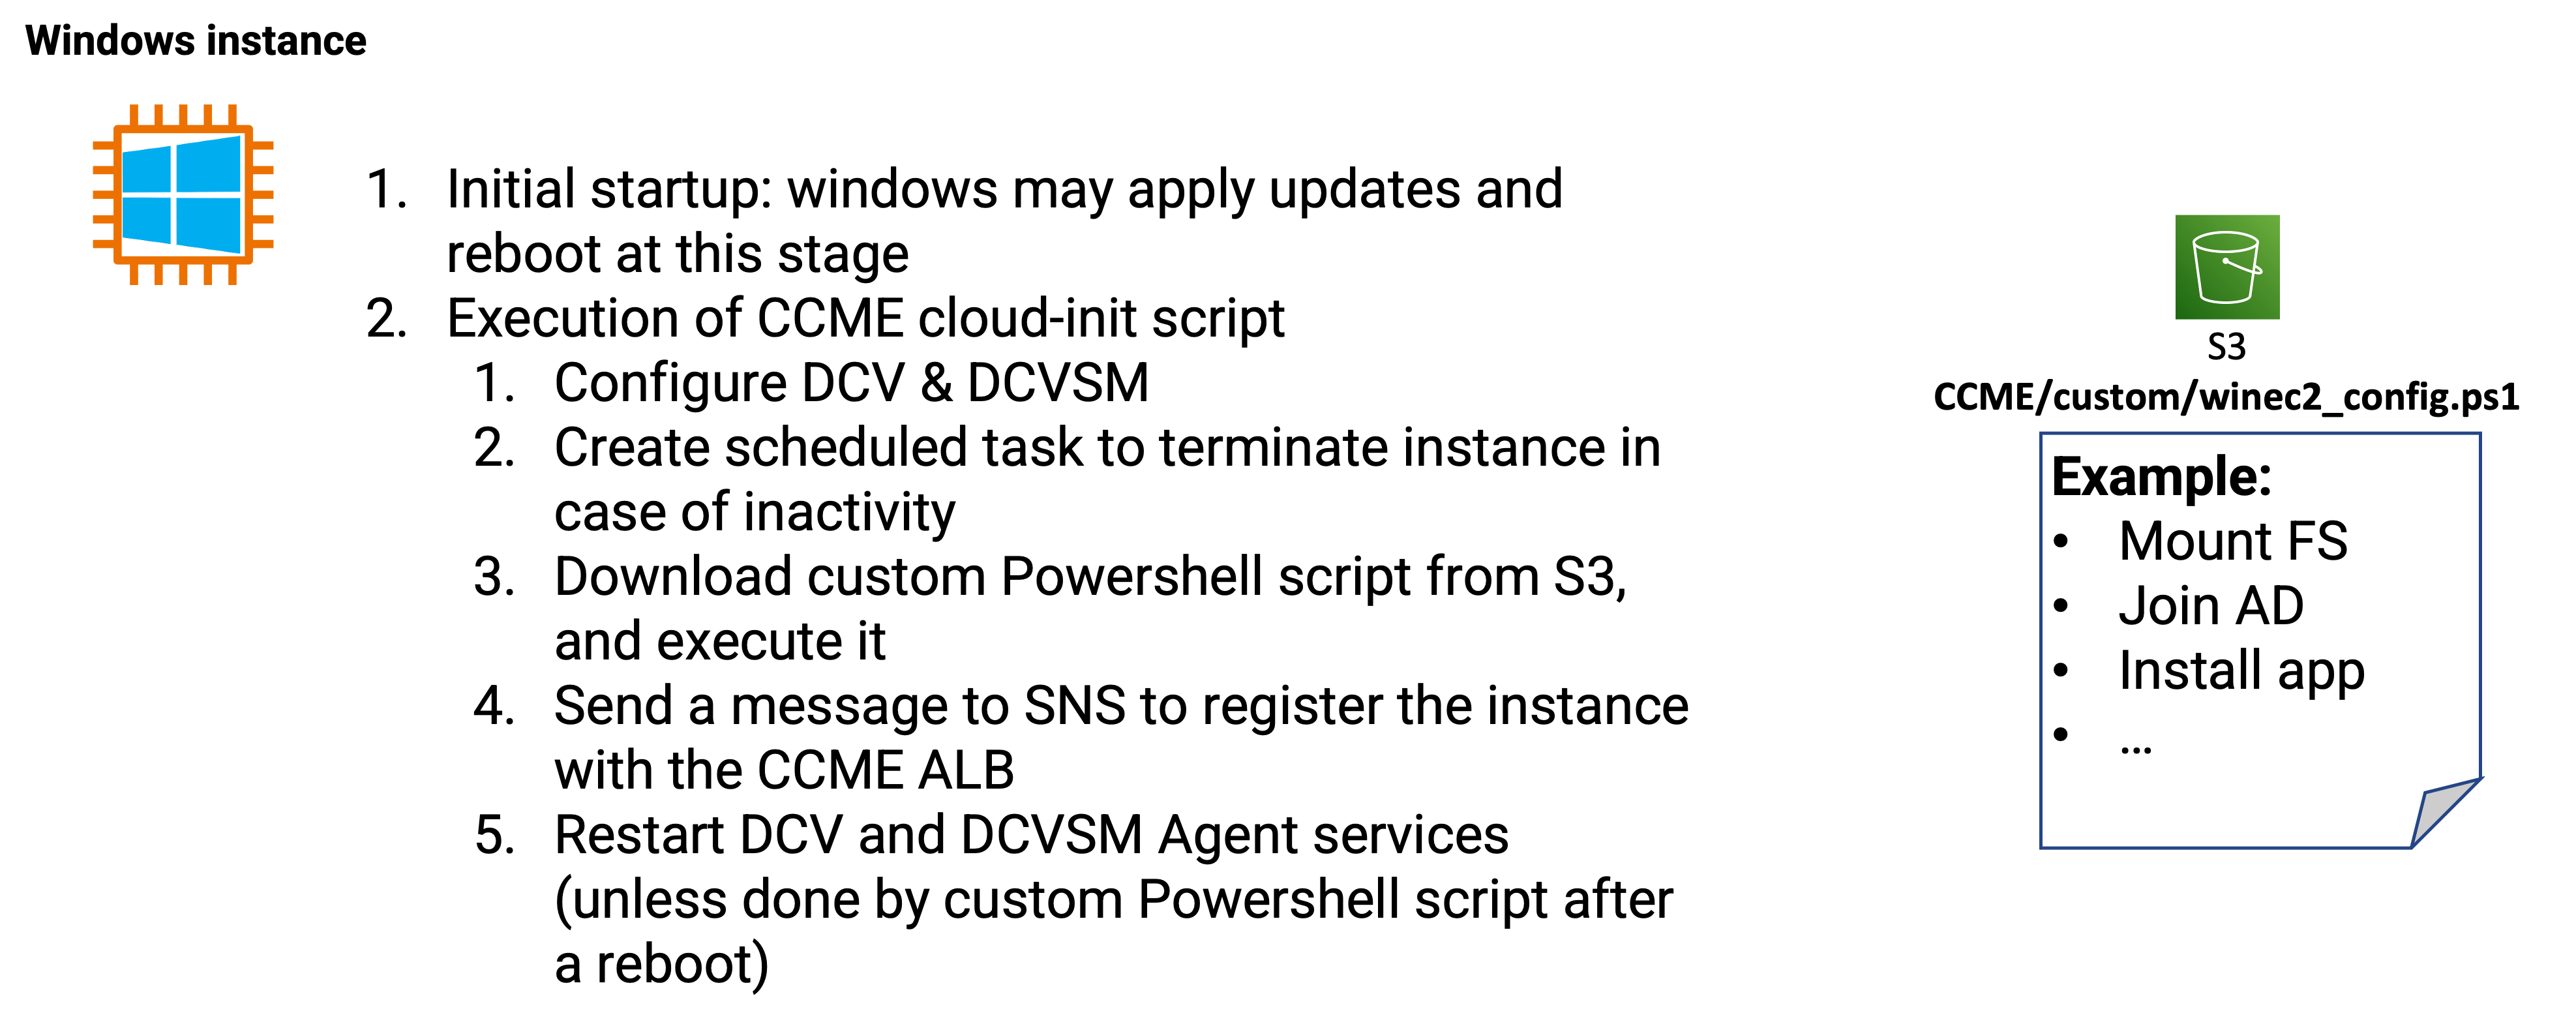
CCME_WIN_AMI.The instance runs a specific EC2 user-data Powershell script during startup. This script is responsible for configuring the following items:
DCV: configuration of the
web-url-pathparameter to match the path used with the ALB, authentication with DCVSM Broker, disable automatic console session.DCVSM agent: configuration of the connectivity to DCSVM Broker on the HeadNode (IP, Certificate), tags (same tags as the EC2 instance, see Cluster termination).
A scheduled task to cleanup the instance in some cases (see Instance cleanup ScheduledTask).
Running a custom Powershell script if it exists: if you put a
winec2_config.ps1file inside thecustomdirectory of CCME in its S3 bucket, then this script will be executed during startup. You can use this script for example to mount additional file systems, add further configurations for Windows, or even join the instance to your Active Directory. Important: if this script reboots the instance, then you need to setCCME_WIN_CUSTOM_CONF_REBOOTtotrue.Sending a message to SNS to register the instance with the CCME ALB.
Restart DCV and DCVSM Agent services.
The instance is tagged with the following tags:
All tags present in the Tags section of the ParallelCluster configuration file and
parallelcluster:*tags created by ParallelCluster.ccme_EF_USER: the username of the user who requested the sessionccme_CLUSTERNAME: the name of the clusterccme_HEADNODE_IP: the IP address of the HeadNode of the clusterccme_interactive_sessionUri: URI internal to EnginFrame to identify the sessionccme_EF_SPOOLER_NAME: name of the Spooler attached to the session in Enginframeparallelcluster:node-type: this tag cannot be changed and its value is alwaysCCME_DCV. This allows the instances to be terminated along with the cluster.All tags present in
CCME_WIN_TAGS: tags describe in this variable supersede the ones present in the Tags section of the ParallelCluster configuration file.
The user is redirected to the
Sessionsview of EnginFrame, and will have to wait for the instance to start (this can take several minutes). The instance will automatically be configured to join the DCVSM cluster, and apply a set of tags to recognize it as belonging to the user and the requested DCV session. Once ready, the user will be redirected to the DCV session in his/her browser or download a DCV file containing the connection information.DCV network streams will go through the Application Load Balancer (ALB) deployed by the Management Stack, just like the Linux DCV sessions.
Limiting the number of sessions per user
EnginFrame provides a way to limit the number of sessions a user can launch at the same time.
Edit the DCV Windows service that you have created in EnginFrame (as an administrator, click on Switch to Admin View,
the Manage/Services and edit your service), click on Settings. There you’ll find two parameters that you can configure to limit
the number of sessions:
Session Class: a String used to identify the type of session you are running. You can simply set it towindowsfor example.Max number of Sessions: the number of concurrent sessions allowed to a user. If you leave it empty, users can launch as many sessions as they want, though they’ll be prompted to reuse an existing session if any. If you set it to1, then only 1 session will be allowed.
Terminating a DCV session and instance cleanup to prevent overspendings
CCME embeds a set of functions and safeguards to prevent overspendings and terminate all Windows instances that are no longer required. In this section, we present these various mechanisms.
Instance shutdown
All Windows instances are launched through a CCME EC2 lauch-template.
This launch template configures the InstanceInitiatedShutdownBehavior parameter of the instance to terminate.
This means that if a shutdown command is issued on the instance, instead of stopping it (and still pay for the attached storages),
the instance is terminated.
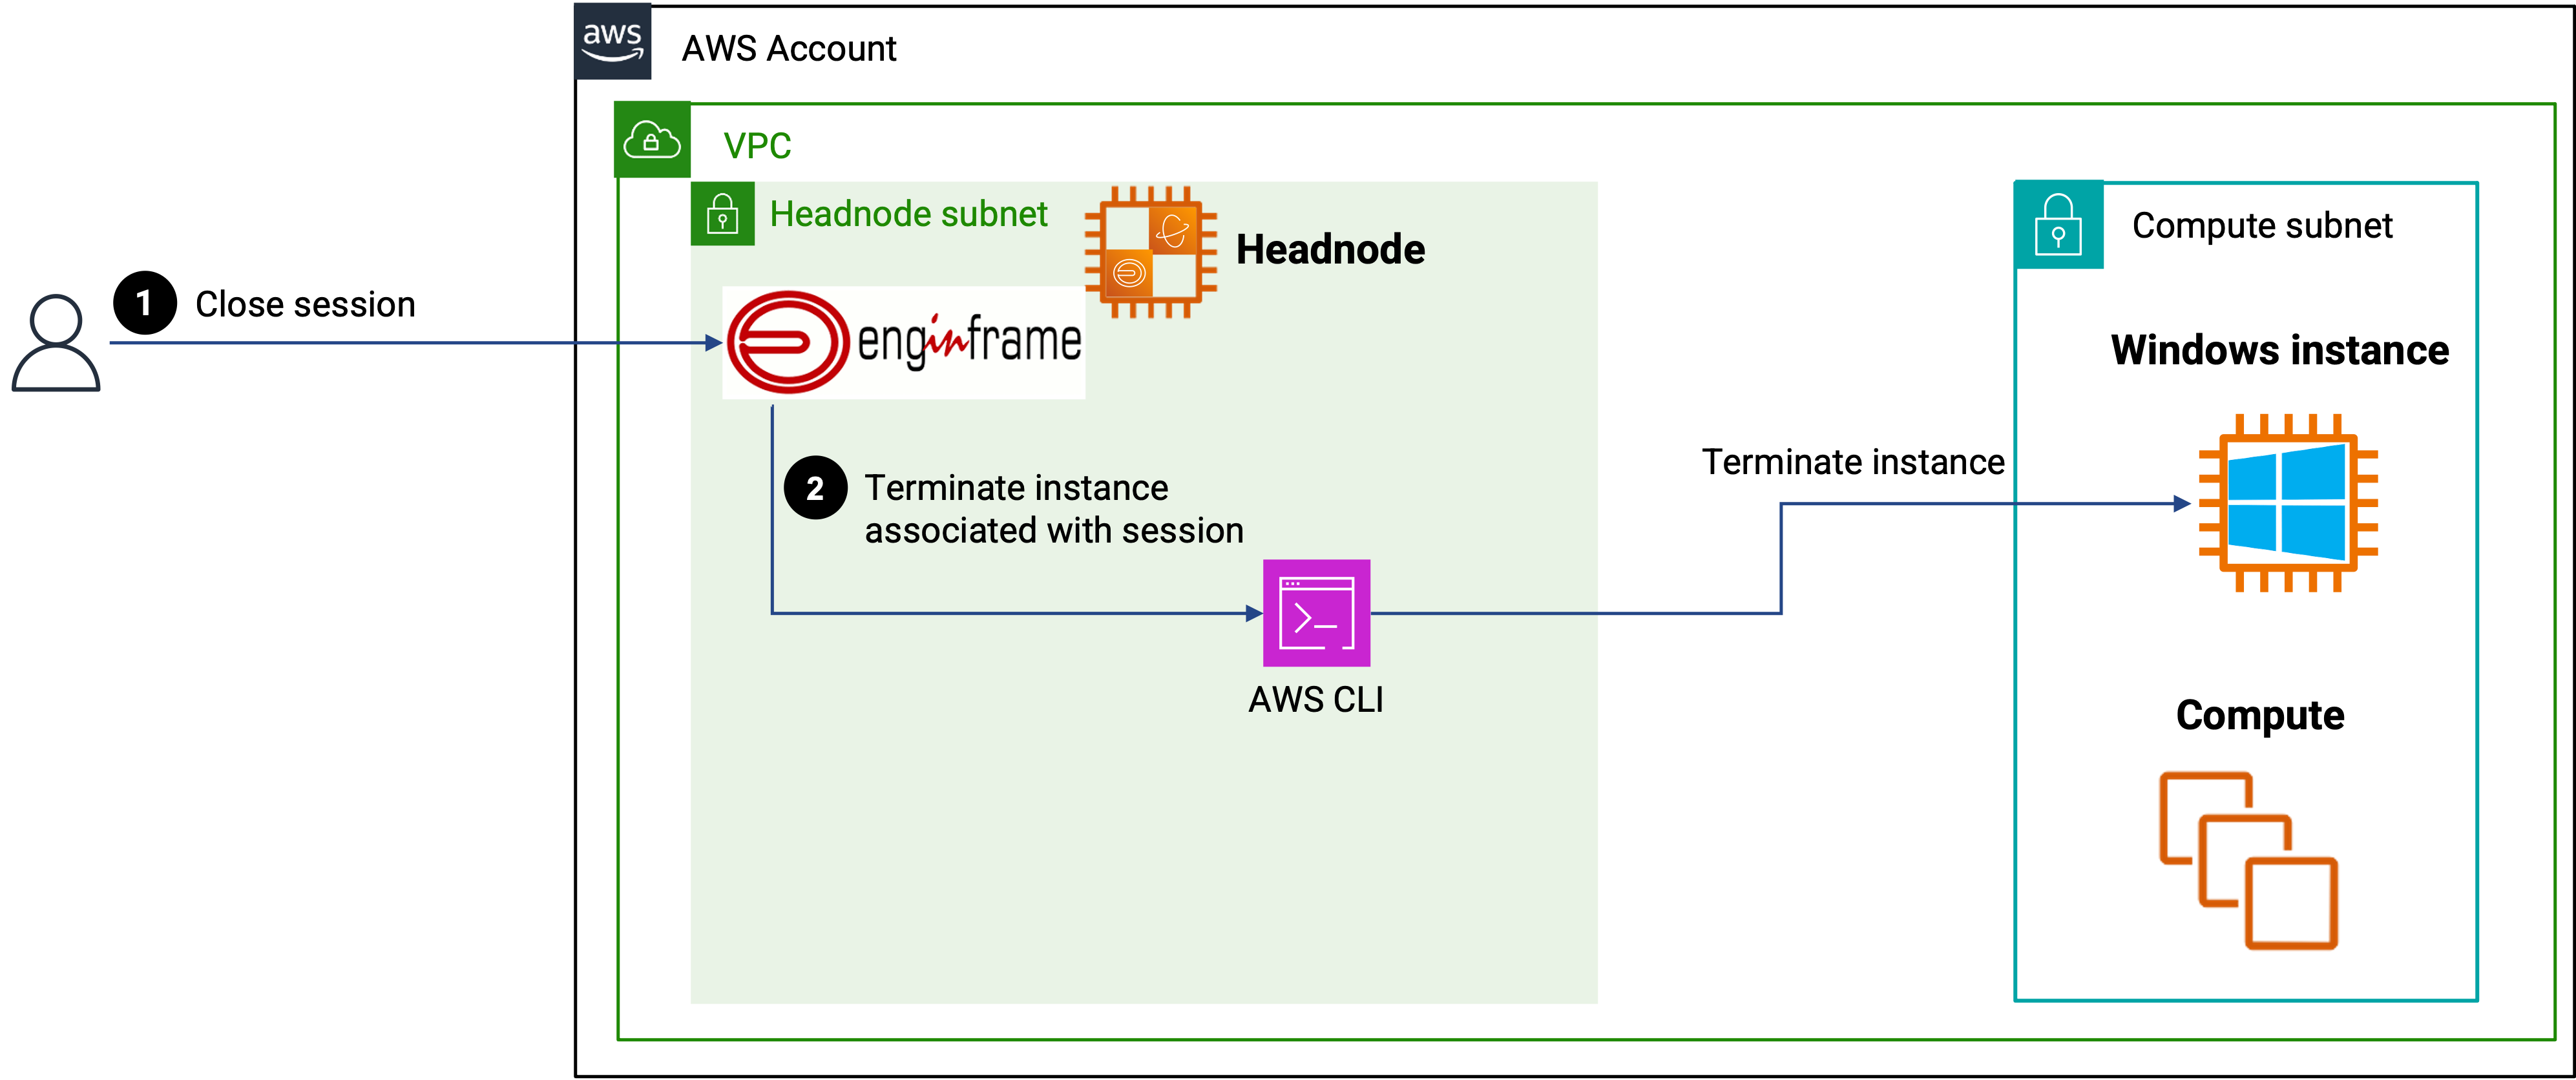
Closing the session from EnginFrame
The best and fastest way to cleanup a Windows instance is simply to close the session from EnginFrame. CCME EF plugin will terminate the instance associated with the session as soon as you request to close it.
Warning
Simply disconnecting from the DCV client or from Windows will not directly trigger the termination of the instance.
Though the instance might be terminated after CCME_WIN_INACTIVE_SESSION_TIME seconds (see Instance cleanup ScheduledTask).
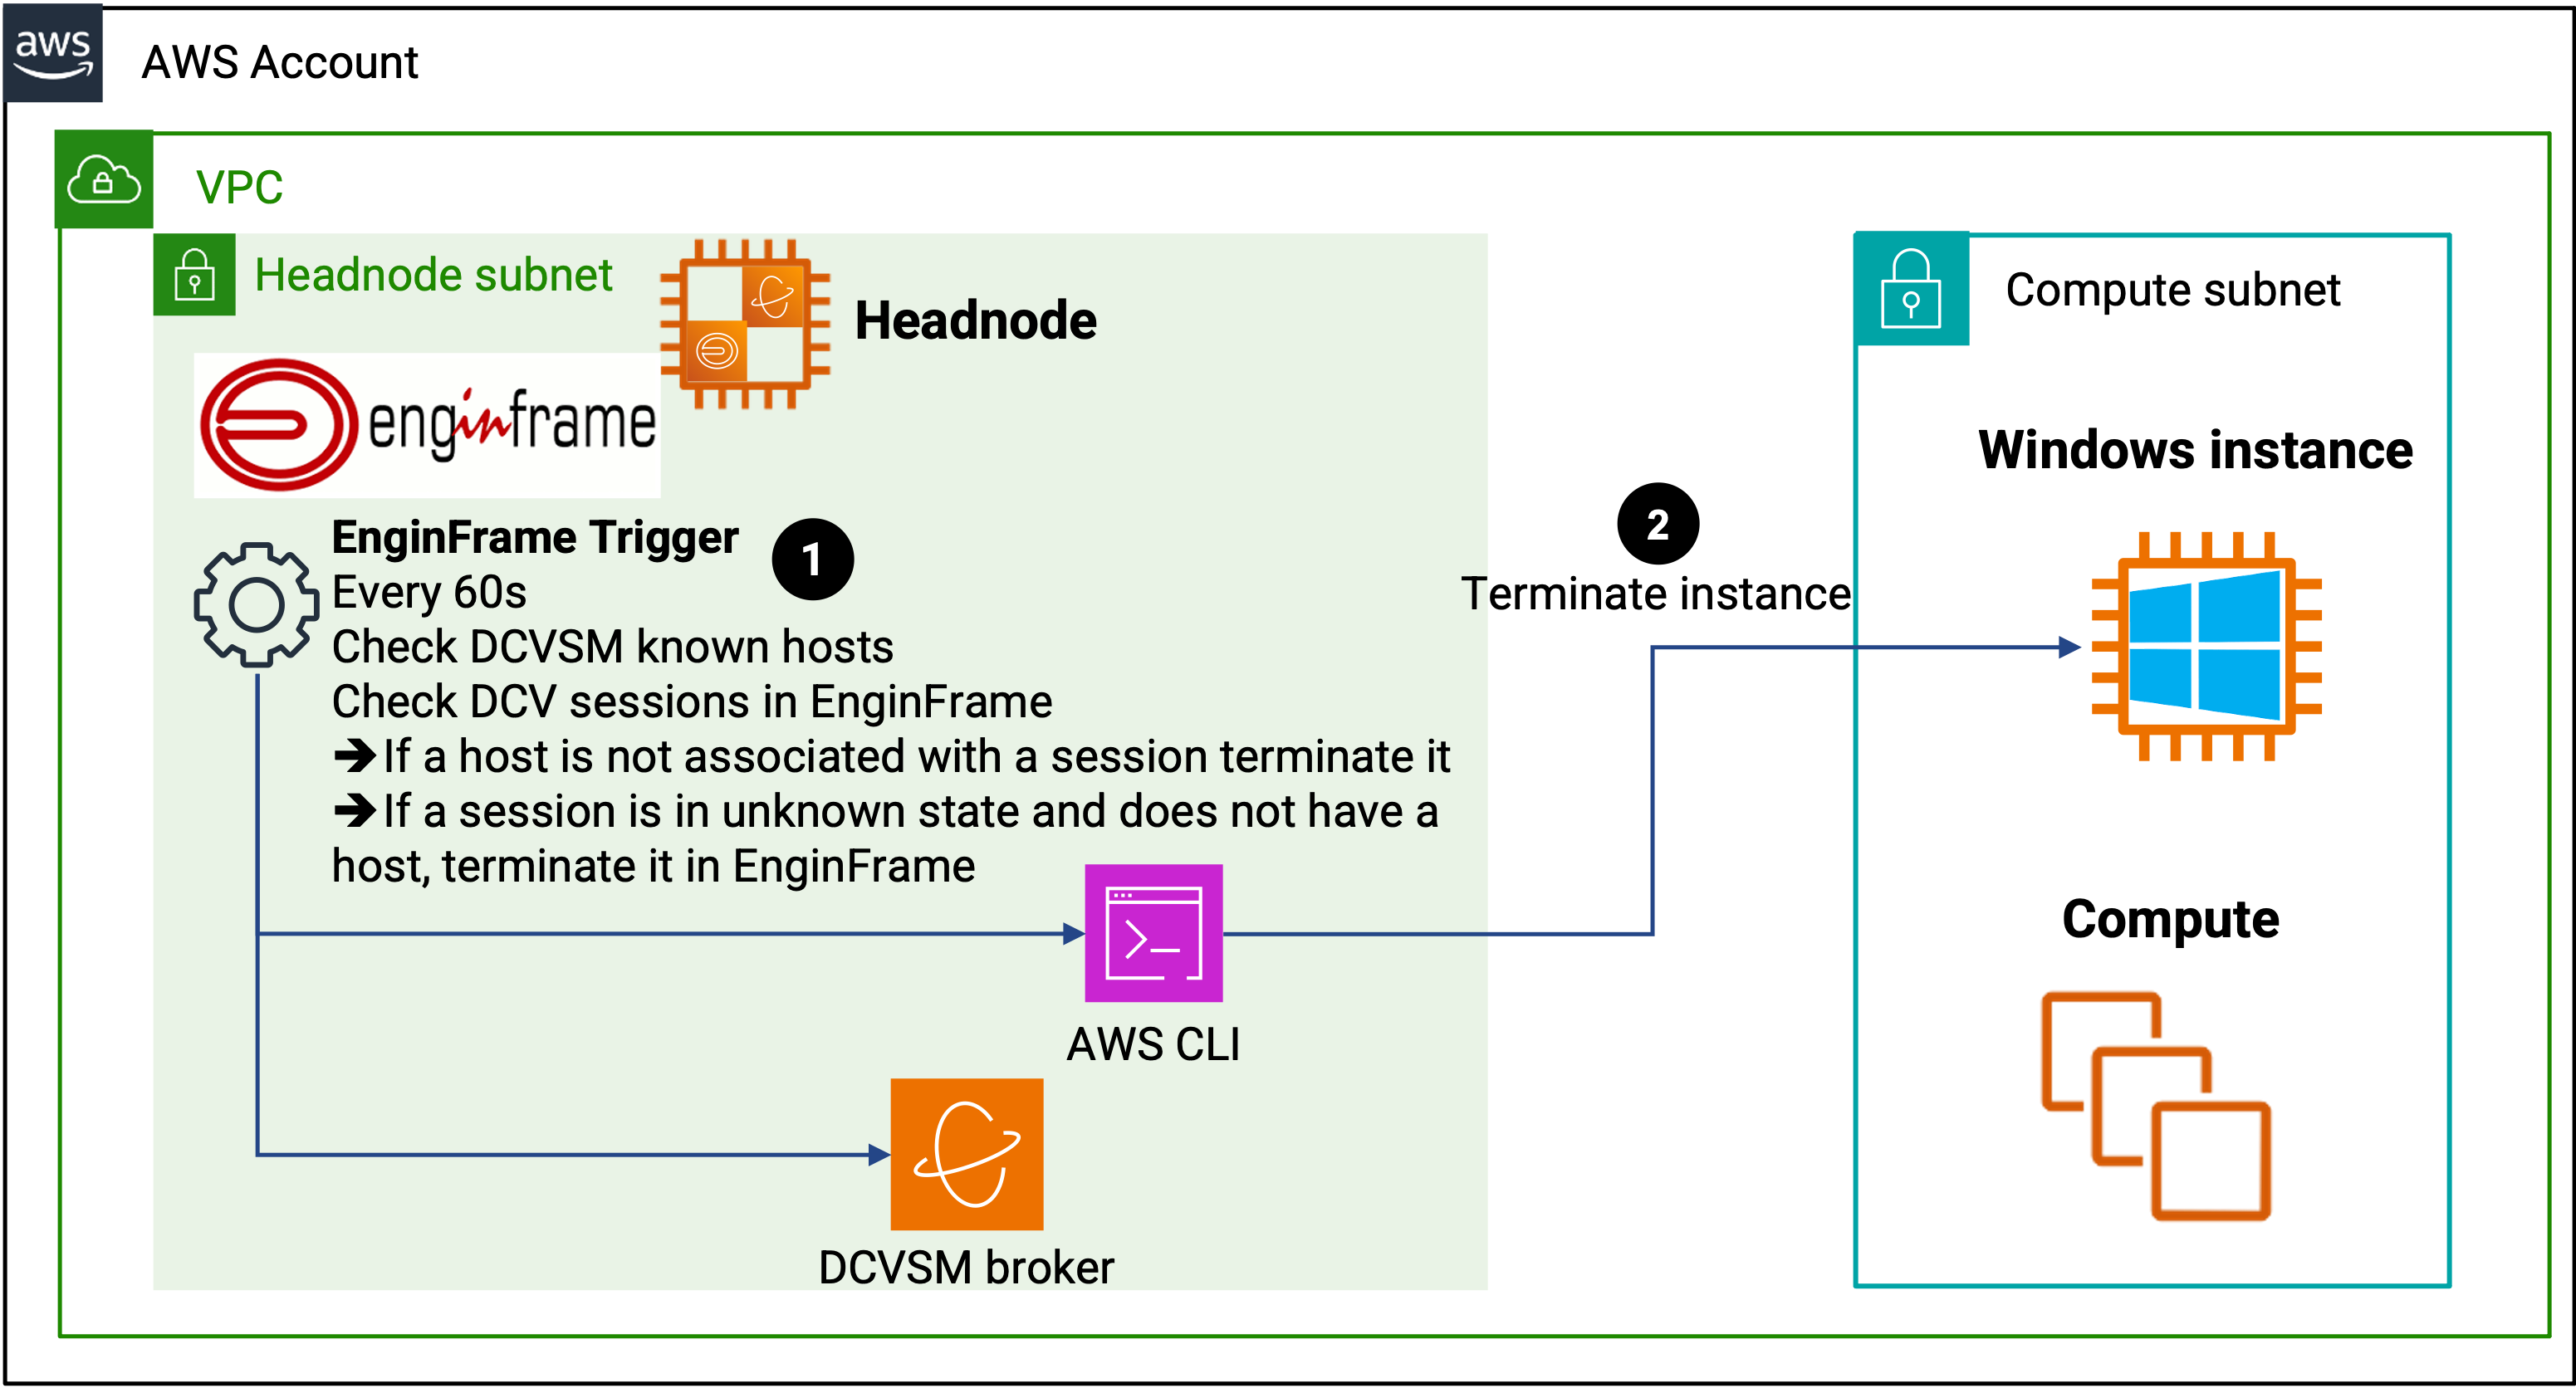
EnginFrame cleanup trigger
CCME EF plugin embeds an EnginFrame trigger that periodically (every 60 seconds) checks known DCVSM hosts and DCV sessions. If it detects that a host does not have a session anymore (e.g., if the session has been closed from the Windows session, not from EnginFrame), then the trigger will terminate such instances. Likewise, if an instance has been terminated (e.g., one of the timeouts have been reached, and the instance killed itself), then the session is marked as terminated in EnginFrame.
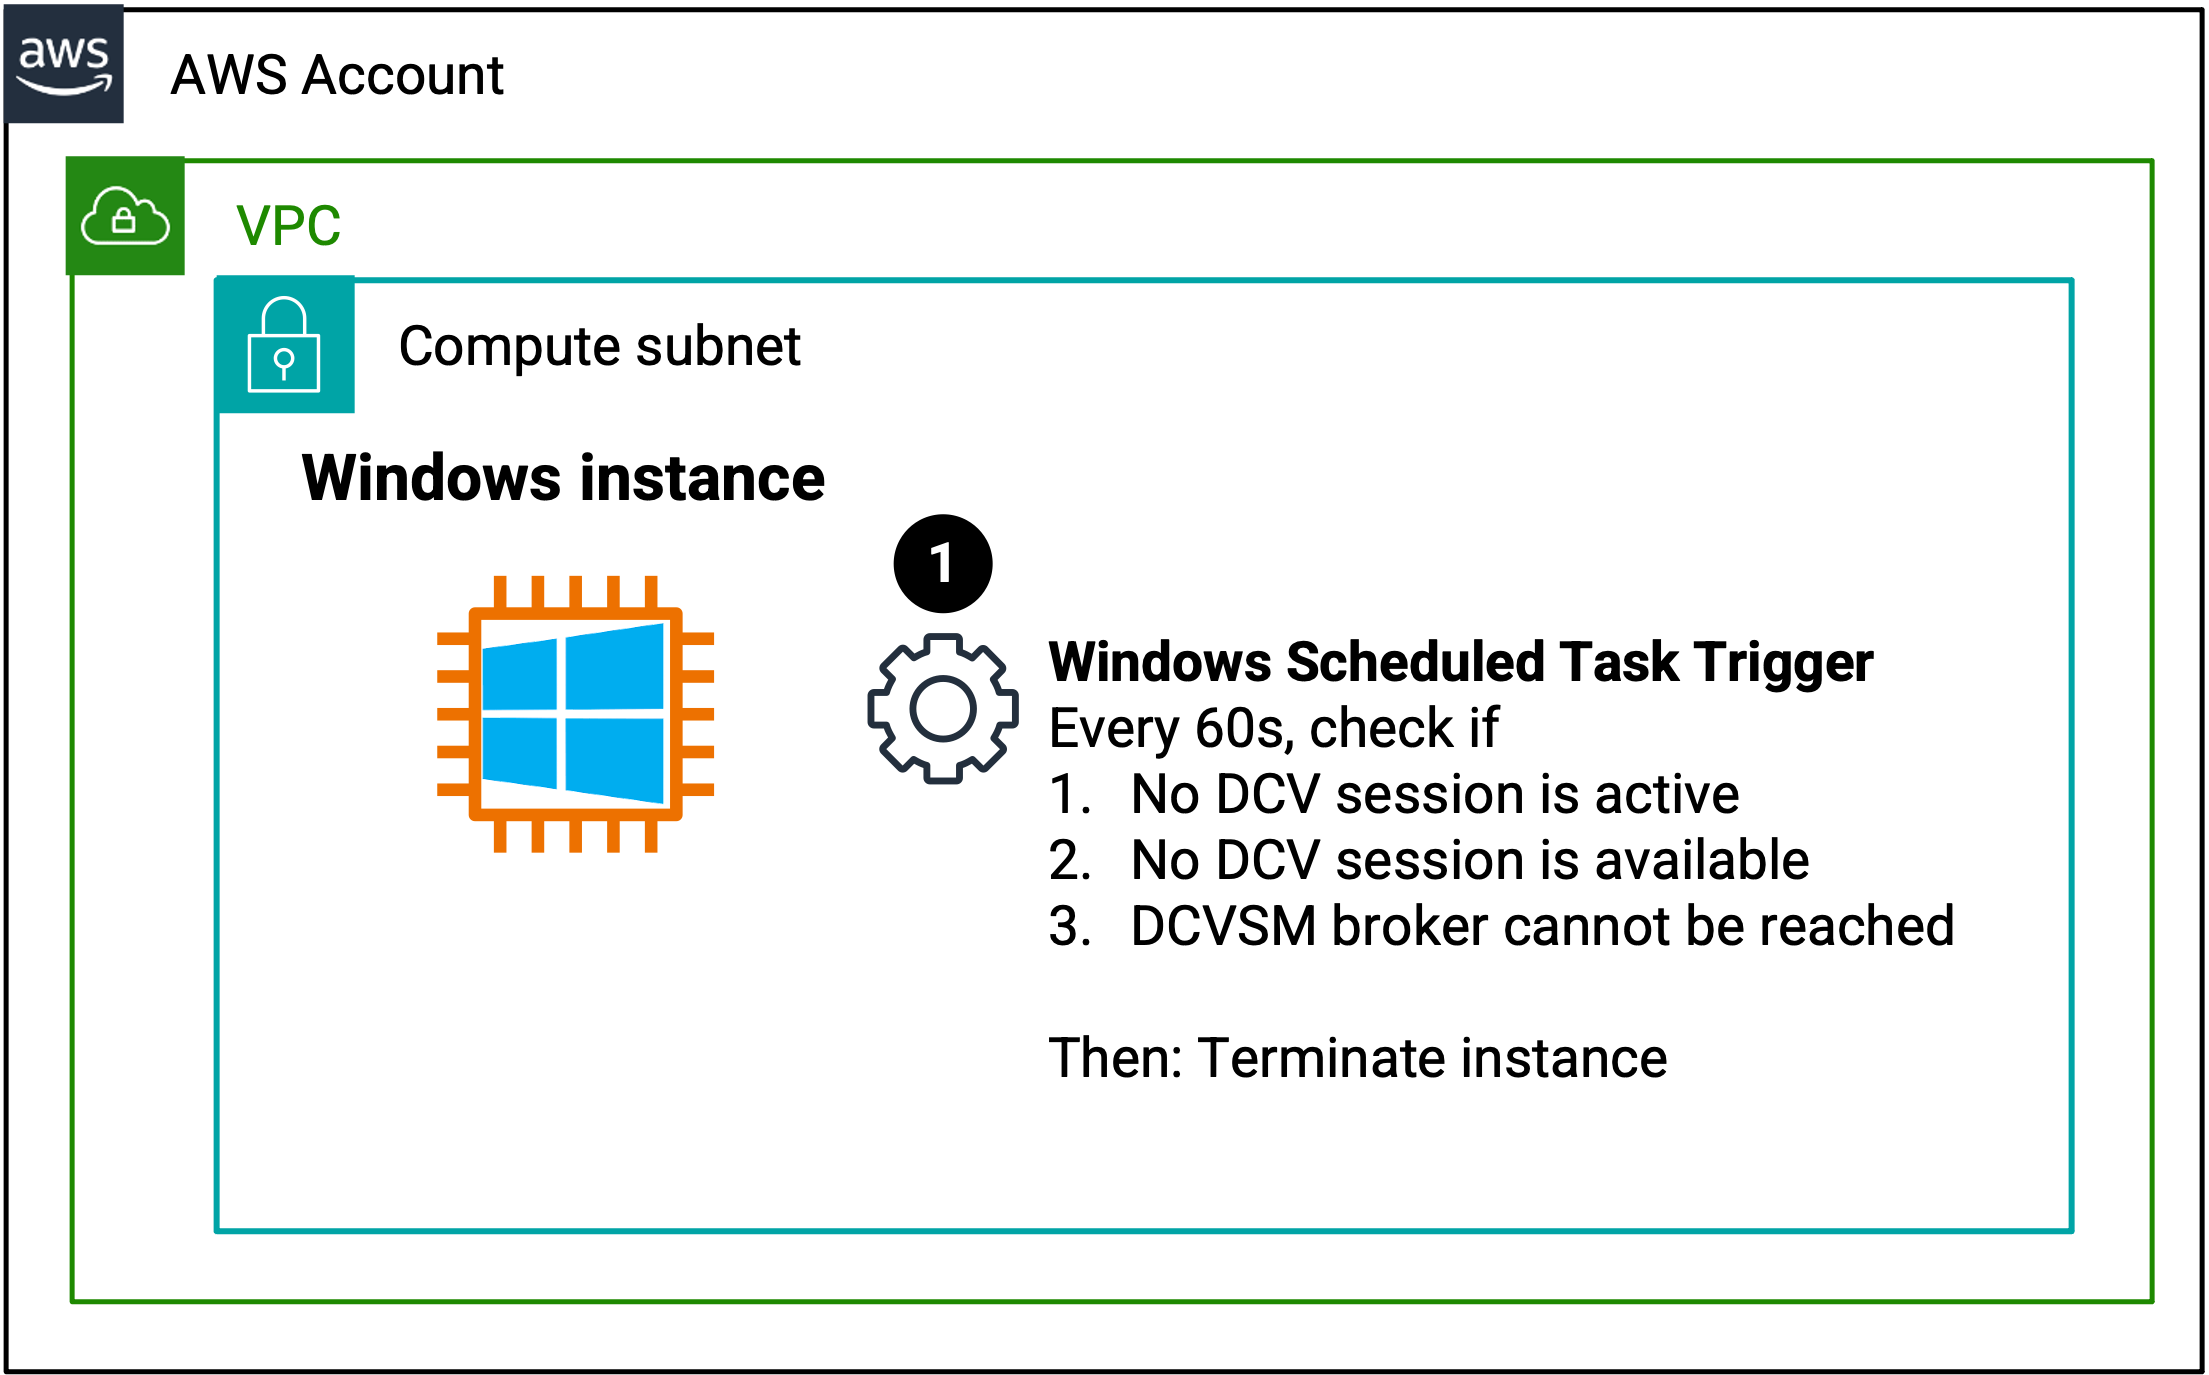
Instance cleanup ScheduledTask
All Windows instances are configured with a periodic ScheduledTask that terminates the instance if one of the following conditions are met:
No DCV session is active since more than
CCME_WIN_INACTIVE_SESSION_TIMEseconds.No DCV session is available and more than
CCME_WIN_NO_SESSION_TIMEseconds have passed since the instance has been started.If the DCVSM broker (on the headnode) cannot be contacted since more than
CCME_WIN_NO_BROKER_COMMUNICATION_TIMEseconds.
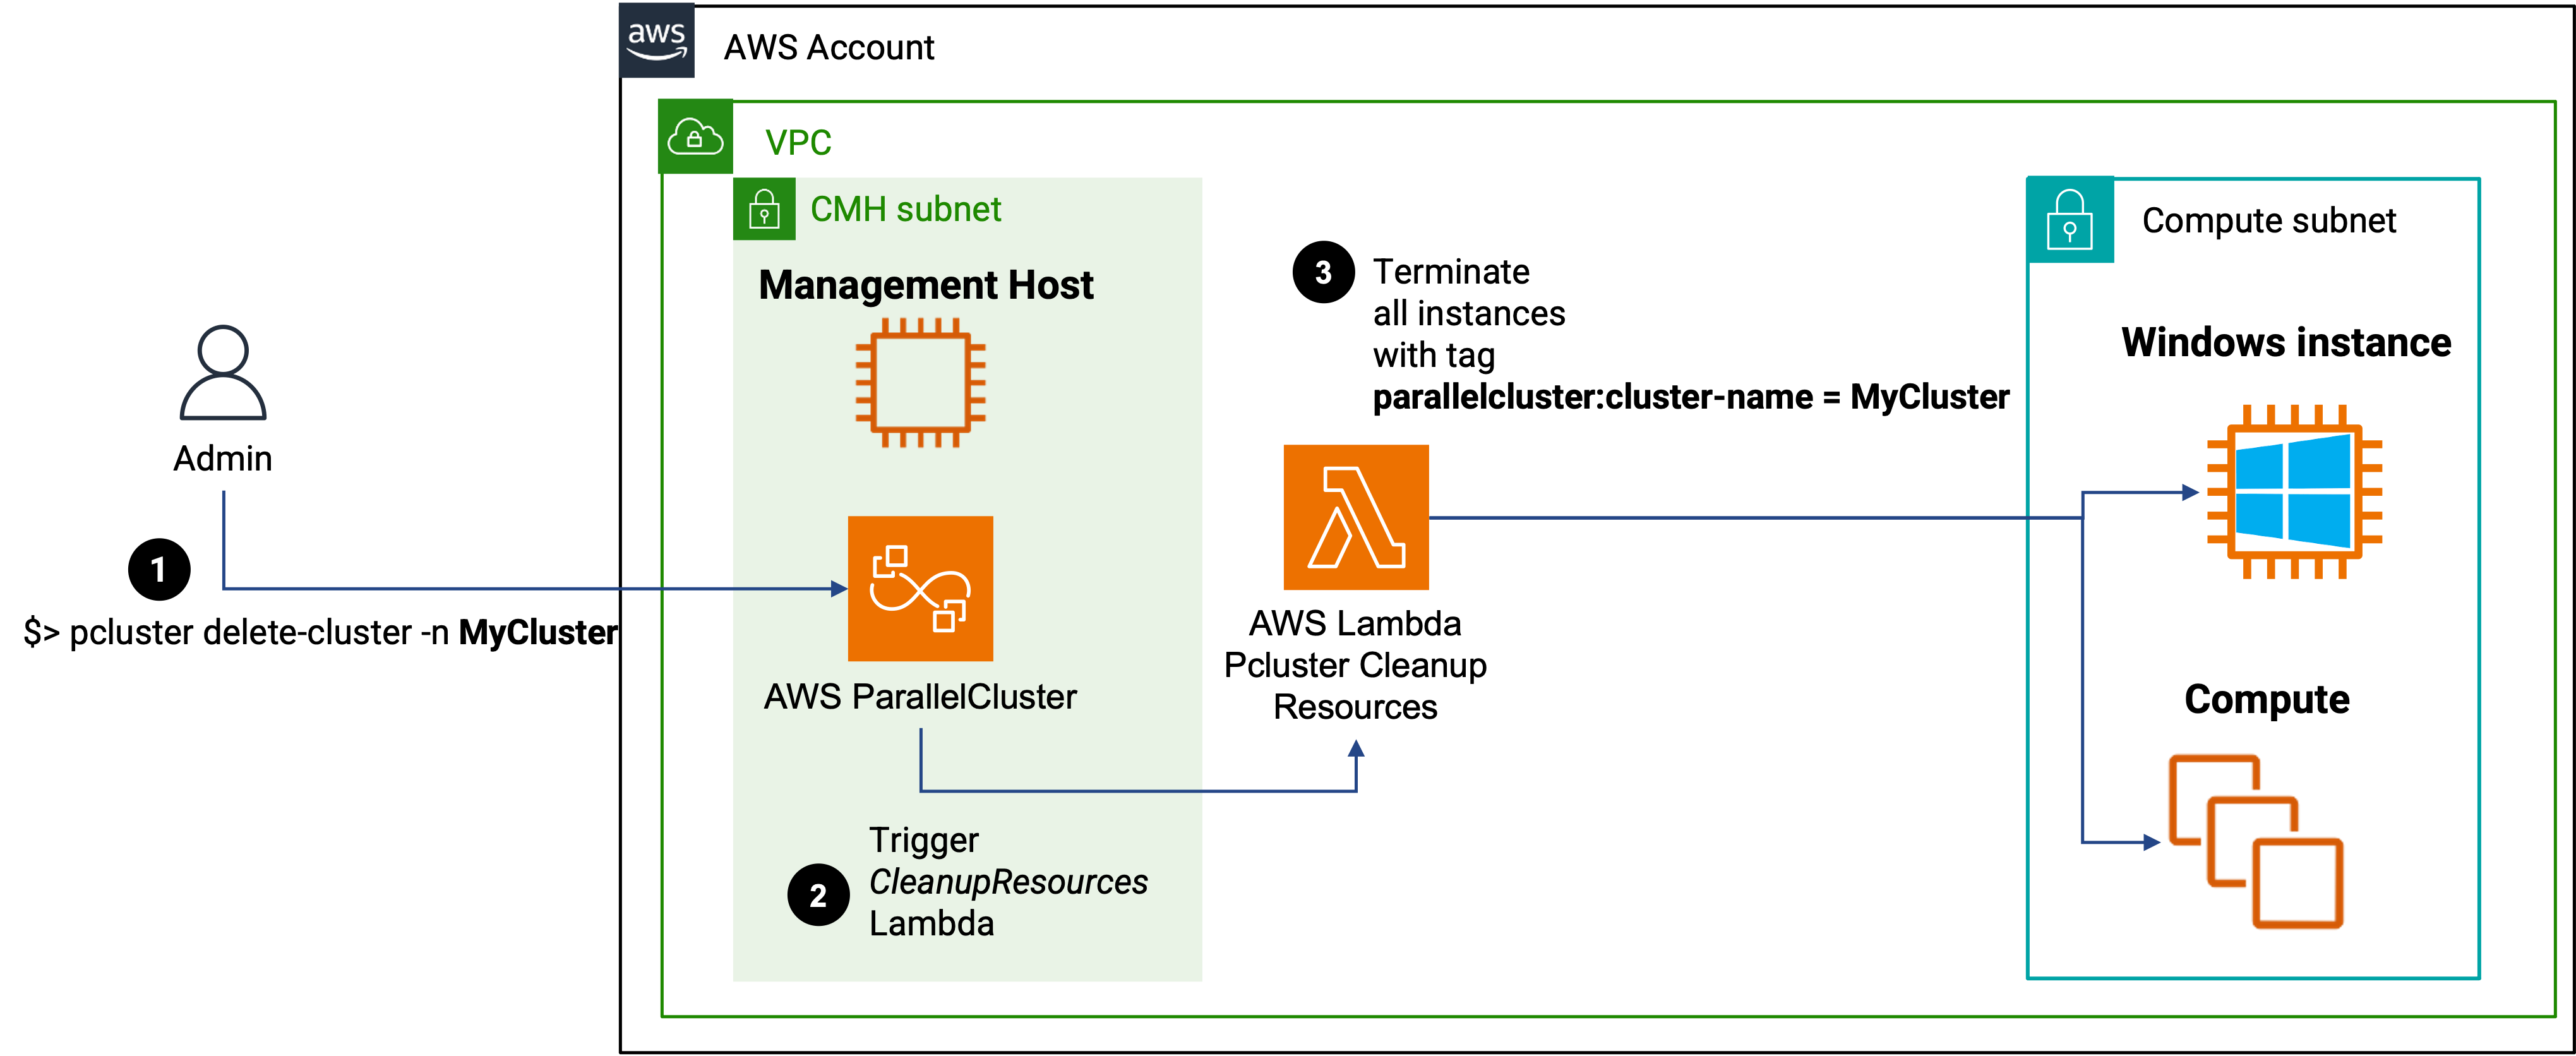
Cluster termination
All Windows instances launched as part of a CCME cluster inherit the parallelcluster:cluster-name tag from the ParallelCluster cluster,
and is also tagged with parallelcluster:node-type=CCME_DCV (the role associated with the AWS ParallelCluster Cleanup Lambda has been
updated to allow cleanup of instances with this tag).
Thus, when you terminate the cluster, all instances with the same parallelcluster:cluster-name tag as the cluster will be terminated
by ParallelCluster through its cleanup Lambda.
Useful tips
File transfer through DCV
Though not the most efficient way to transfer files, you can enable file transfer through DCV sessions
with the DCV Session Storage feature.
To do so, you need to edit your DCV service in EnginFrame. Connect to EnginFrame as an administrator
(e.g., efadmin), click on Switch to Admin View and go to Manage/Services.
Edit the target DCV Linux - queue XXX service, click on the Launch Session button.
You will need to edit both the Action Script and the App Launcher Script:
Action Script: add the--storage-root <target_dir>option to thevdi.launch.sessioncommand. For example, if you want your users to be able to upload to/download from theirHOMEdirectory, you can update the service as follows (keep the--queue "dcv-XXX"option that is present in your service):export dcv_share_target_dir="${HOME}" vdi.launch.session --storage-root "${dcv_share_target_dir}" --queue "dcv-XXX"
App Launcher Script: add the following script:_dcv_session_id=$(echo ${XAUTHORITY}| rev | cut -d/ -f1 | rev | cut -d. -f1) # Note: the dcv_share_target_dir variable is available as it has been exported in the Action Script if [[ ! -e "${dcv_share_target_dir}" ]]; then mkdir -p "${dcv_share_target_dir}" fi dcv set-storage-root --session="${_dcv_session_id}" "${dcv_share_target_dir}"
How to reduce start time with Windows VDI?
Depending on your AMI and your custom winec2_config.ps1 script, starting a Windows Instance can be quite long (in our test setups it ranges from
2 minutes 30 seconds, to 10 minutes, but it can be longer depending on your setup).
Here are a few tips you can follow to improve start time:
Package all you can in the AMI: instead of installing software in
winec2_config.ps1, preinstall as much as you can in your AMI, and only run dynamic configurations in the custom script.Keep your AMI up to date: running Windows Update when starting the instance can have a huge impact on the start time. Downloading & installing the patches, and then usually rebooting the instance are needed before you can connect to a DCV session. Regularly update your AMI and update the
CCME_WIN_AMIvariable: either update your ParallelCluster configuration file and run a full cluster update, or simply specify theCCME_WIN_AMIvariable in the corresponding EnginFrame DCV service.Disable unnecessary services from startup: Review your system services and disable any unnecessary ones that might be running during boot. You can use the Windows Services console. In this step, you can even deactivate the
dcvserverandDcvSessionManagerAgentServiceas these service will be restarted by CCME, you can do so with the following command:Set-Service -Name 'dcvserver' -StartupType Manual -Status Stopped Set-Service -Name 'DcvSessionManagerAgentService' -StartupType Manual -Status Stopped
Make sure the drivers are up to date before syspreping. To list the AWS drivers and driver versions that run on the Windows instance, run this Windows PowerShell command
Get-WmiObject Win32_PnpSignedDriver | Select-Object DeviceName, DriverVersion, InfName | Where-Object {$_.DeviceName -like "*AWS*" -OR $_.DeviceName -like "*Amazon*"}
Refer to this link for how to upgrade the drivers.
Activate EC2 Fast Launch: EC2 Fast Launch is a service that pre-launches Windows instances to complete the standard Windows launch steps, and then create pre-provisioned snapshots of the instances. This then allows to launch Windows instances much faster. You can use the following commands to Enable, Disable Fast Launch and Check if it is activated on a given AMI. For these commands, simply replace
ami-XXXXby the Windows AMI you created, andlt-XXXXby the Launch Template created by CCME with the CMH CloudFormation stack (check for theccmeWindowsFleetLaunchTemplateIdoutput of the stack), replace--region eu-west-1by the region you are currently working in.# The "TargetResourceCount=10" option lets you specify the number of snapshots you wish to be available (here 10) # The "--max-parallel-launches 6" option lets you specify how many snapshots should be created in parallel (here 6) aws ec2 enable-fast-launch --region eu-west-1 --image-id ami-XXXX --launch-template 'LaunchTemplateId=lt-XXXX,Version=$Latest' --max-parallel-launches 6 --snapshot-configuration 'TargetResourceCount=10'
aws ec2 disable-fast-launch --region eu-west-1 --image-id ami-XXXX
aws ec2 describe-fast-launch-images --region eu-west-1 --image-id ami-XXXX
Warning
Tags applied at the CMH CloudFormation stack are currently not passed to the EC2 Launch Template used by EC2 Fast Launch; this feature is not supported by CloudFormation. This means that if you need to add specific tags to the instances created during EC2 Fast Launch Snapshot creation, you will need to edit the EC2 Launch Template and add the tags in its “Resource tags”.
DCV Windows instances launched by CCME do inherit from the tags applied on the Cluster.