NetApp ONTAP File system creation
This documentation explains how you can create a file system that is shared between the Linux HPC Cluster, and Windows workstations. Having a shared file system between the Linux and Windows world allows for a seamless end-user experience from pre-processing, to numerical simulation, and finally to post-processing the results. Through CCME, both Linux and Windows remote DCV sessions can be launched (see Remote visualization with DCV).
Prerequisites
An Active Directory (e.g., an AWS Managed Active Directory deployed with CCME or your own). You will need to know:
the domain name
an account (login and password) in the AD with sufficient privileges to either
join the NetApp to the domain,
register the NetApp to an existing
Computerobject in the AD.
the LDAP schema (AD-SFU, AD-IDMU, MS-AD-BIS, RFC-2307…)
the IP of the domain name servers
the OU in which ONTAP will be joined
Sufficient rights in AWS to create and manage FSx for NetApp ONTAP (see for example AWS managed policies for Amazon FSx), and any additional resources you might need (e.g., EC2 instances to mount the file systems).
Note
In the following examples, you will need to update the parameters used in the various commands.
We use a generic password (MyPassword1234!) for all our commands, but you will want to ensure
to use a more secure and stronger one and adapt each password for each different user,
also potentially store them in AWS Secret Manager.
FSx for NetApp ONTAP creation
The very first step is to create an FSx for NetApp ONTAP in your AWS account. We demonstrate below how to create the file system through the AWS CLI. This involves a bit more steps than doing it from the AWS Console, but it allows more control on the configuration of the ONTAP configuration, and makes it easier to script if you need to automate the process.
Here, we deploy a 1 TB (1024 GB) ONTAP file system, deployed in a single AZ, with
3 IOPS per provisioned GB (DiskIopsConfiguration.Mode=AUTOMATIC) and a throughput
of 128 MBps. See the documentation of
aws fsx create-file-system
for a detailed explanation of the parameters.
aws fsx create-file-system \
--file-system-type ONTAP \
--storage-capacity 1024 \
--subnet-ids subnet-0ce3c1590479aa063 \
--security-group-ids sg-072d8d06457ed28a9 \
--tags Key=Owner,Value=myuser Key=Reason,Value=netapp Key=Name,Value=myuser-netapp \
--ontap-configuration '{"DeploymentType": "SINGLE_AZ_1", "FsxAdminPassword": "MyPassword1234!", "DiskIopsConfiguration": {"Mode": "AUTOMATIC"}, "ThroughputCapacity": 128}'
Expect to receive a reply such as:
{
    "FileSystem": {
        "OwnerId": "044118062099",
        "CreationTime": "2023-10-25T09:29:17.143000+02:00",
        "FileSystemId": "fs-04f9760f8c19704c2",
        "FileSystemType": "ONTAP",
        "Lifecycle": "CREATING",
        "StorageCapacity": 1024,
        "StorageType": "SSD",
        "VpcId": "vpc-08359529d60df0c01",
        "SubnetIds": [
            "subnet-0ce3c1590479aa063"
        ],
        "KmsKeyId": "arn:aws:kms:eu-west-1:044118062099:key/0f1857fc-ac54-4edb-8ef5-5d1e732dc883",
        "ResourceARN": "arn:aws:fsx:eu-west-1:044118062099:file-system/fs-04f9760f8c19704c2",
        "Tags": [
            {
                "Key": "Owner",
                "Value": "myuser"
            },
            {
                "Key": "Reason",
                "Value": "netapp"
            },
            {
                "Key": "Name",
                "Value": "myuser-netapp"
            }
        ],
        "OntapConfiguration": {
            "AutomaticBackupRetentionDays": 30,
            "DailyAutomaticBackupStartTime": "02:30",
            "DeploymentType": "SINGLE_AZ_1",
            "Endpoints": {
                "Intercluster": {
                    "DNSName": "intercluster.fs-04f9760f8c19704c2.fsx.eu-west-1.amazonaws.com"
                },
                "Management": {
                    "DNSName": "management.fs-04f9760f8c19704c2.fsx.eu-west-1.amazonaws.com"
                }
            },
            "DiskIopsConfiguration": {
                "Mode": "AUTOMATIC",
                "Iops": 3072
            },
            "PreferredSubnetId": "subnet-0ce3c1590479aa063",
            "ThroughputCapacity": 128,
            "WeeklyMaintenanceStartTime": "5:00:00"
        }
    }
}
You can check the status of your file system with aws fsx describe-file-systems --file-system-ids fs-04f9760f8c19704c2
(documentation describe-file-systems).
You will get a reply similar as the one above. Check the Lifecycle parameter (until you get an AVAILABLE status).
Configure ONTAP
In this section, we will create and configure the following elements:
a Storage Virtual Machine (SVM)
1 NTFS volume
a CIFS share joined to an Active Directory
an NFS share connected to the Active Directory through LDAP
SVM Creation
We will first create an SVM (see documentation create-storage-virtual-machine for a complete description of the parameters), and directly make it join the Active Directory.
aws fsx create-storage-virtual-machine \
--file-system-id fs-04f9760f8c19704c2 \
--name bdtestsvm \
--svm-admin-password 'MyPassword1234!' \
--tags Key=Owner,Value=myuser Key=Reason,Value=netapp Key=Name,Value=myuser-netapp \
--root-volume-security-style UNIX \
--active-directory-configuration SelfManagedActiveDirectoryConfiguration='{UserName="Admin",Password="MyPassword1234!",DnsIps=["10.0.3.66","10.0.1.213"],DomainName="ccme.ad",OrganizationalUnitDistinguishedName="OU=Computers,OU=ccme,DC=ccme,DC=ad",FileSystemAdministratorsGroup="Domain Admins"}',NetBiosName=netapp
Note
It is important that the --root-volume-security-style option has a value of UNIX, even if later we will
be creating a volume with NTFS security style to be shared between Linux and Windows instances.
If the root volume security style is not set to UNIX, you won’t be able to mount additional volumes with NFSv4.
In case you made a mistake, you can still change the security-style later, by running the following command in the
ONTAP console: volume modify -volume bdtestsvm_root -security-style unix (see below to access the ONTAP console).
Note
SVM creation must be done using the AWS APIs/CLI, you cannot use the vserver create from the ONTAP CLI.
Doing so will result in the following error: Error: command failed: not authorized for that command.
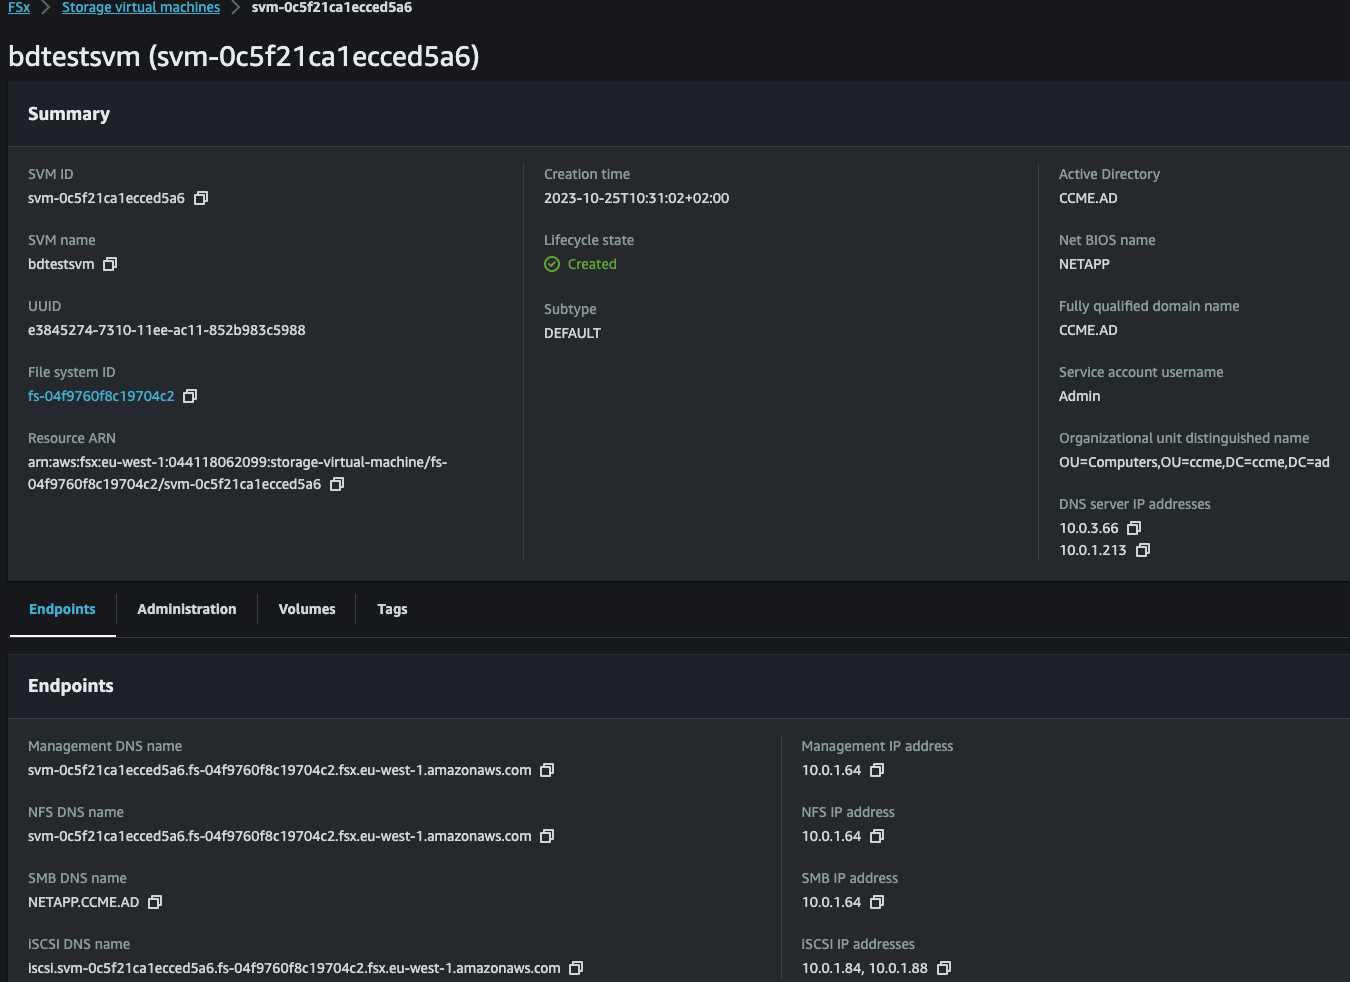
Expect a reply similar to:
{
    "StorageVirtualMachine": {
        "ActiveDirectoryConfiguration": {
            "NetBiosName": "NETAPP",
            "SelfManagedActiveDirectoryConfiguration": {
                "DomainName": "ccme.ad",
                "OrganizationalUnitDistinguishedName": "OU=Computers,OU=ccme,DC=ccme,DC=ad",
                "UserName": "Admin",
                "DnsIps": [
                    "10.0.3.66",
                    "10.0.1.213"
                ]
            }
        },
        "CreationTime": "2023-10-25T10:31:02.676000+02:00",
        "Endpoints": {
            "Iscsi": {
                "DNSName": "iscsi.svm-0c5f21ca1ecced5a6.fs-04f9760f8c19704c2.fsx.eu-west-1.amazonaws.com"
            },
            "Management": {
                "DNSName": "svm-0c5f21ca1ecced5a6.fs-04f9760f8c19704c2.fsx.eu-west-1.amazonaws.com"
            },
            "Nfs": {
                "DNSName": "svm-0c5f21ca1ecced5a6.fs-04f9760f8c19704c2.fsx.eu-west-1.amazonaws.com"
            },
            "Smb": {
                "DNSName": "NETAPP.ccme.ad"
            }
        },
        "FileSystemId": "fs-04f9760f8c19704c2",
        "Lifecycle": "PENDING",
        "Name": "bdtestsvm",
        "ResourceARN": "arn:aws:fsx:eu-west-1:044118062099:storage-virtual-machine/fs-04f9760f8c19704c2/svm-0c5f21ca1ecced5a6",
        "StorageVirtualMachineId": "svm-0c5f21ca1ecced5a6",
        "Subtype": "DEFAULT",
        "Tags": [
            {
                "Key": "Owner",
                "Value": "myuser"
            },
            {
                "Key": "Reason",
                "Value": "netapp"
            },
            {
                "Key": "Name",
                "Value": "myuser-netapp"
            }
        ]
    }
}
You can check the status of your SVM with aws fsx describe-storage-virtual-machines --storage-virtual-machine-ids svm-0c5f21ca1ecced5a6
(documentation describe-storage-virtual-machines).
You will get a reply similar as the one above. Check the Lifecycle parameter (until you get a CREATED status).
Note
In the above example, we used the --active-directory-configuration parameter to directly join the SVM
to our Active Directory. In some cases, it might be necessary to do this in a second step, and not during
SVM creation.
For example, you might want to reuse an already existing Computer object in your Active Directory
instead of joining ONTAP and creating a new Computer object. You can pre-stage a computer account
within Active Directory and use this account to join an FSx for NetApp ONTAP SVM to Active Directory.
First you need to create your Computer object in the Active Directory. For our example, we have created an object with the following attributes:
name=NETAPPdistinguishedName=CN=NETAPP,OU=Computers,OU=ccme,DC=ccme,DC=addNSHostName=NETAPP.CCME.AD
Then, on the ONTAP management console (see below after this note on how to connect to the ONTAP management console), you need to execute the following steps:
Create a DNS configuration (vserver services name-service dns create)
FsxId04f9760f8c19704c2::vserver> vserver services name-service dns create -vserver bdtestsvm  -domains ccme.ad -name-servers 10.0.3.66,10.0.1.213 -skip-config-validation false

FsxId04f9760f8c19704c2::vserver> vserver services name-service dns show
                                                    Name
Vserver         Domains                             Servers
--------------- ----------------------------------- ----------------
bdtestsvm       ccme.ad                             10.0.3.66,
                                                    10.0.1.213
Create a CIFS server (vserver cifs create). When you issue this command passing in the existing account name and correct LDAP path, ONTAP will alert you that an account with this name already exists within Active Directory and prompt if it’s okay to reuse this account. If you answer yes to this prompt then the pre-staged Computer account will be used and the SVM will be properly joined to Active Directory.
FsxId04f9760f8c19704c2::vserver> vserver cifs create -vserver bdtestsvm -cifs-server NETAPP -domain ccme.ad -ou OU=Computers,OU=CCME

In order to create an Active Directory machine account for the CIFS server, you must supply the name and password of a Windows account with sufficient privileges to add computers to the "OU=Computers,OU=CCME" container within the
"CCME.AD" domain.

Enter the user name: Admin

Enter the password:

Warning: An account by this name already exists in Active Directory at CN=NETAPP,OU=Computers,OU=ccme,DC=ccme,DC=ad.
        If there is an existing DNS entry for the name NETAPP, it must be removed. Data ONTAP cannot remove such an entry.
        Use an external tool to remove it after this command completes.
        Ok to reuse this account? {y|n}: y

Notice: SMB1 protocol version is obsolete and considered insecure. Therefore it is deprecated and disabled on this CIFS server. Support for SMB1 might be removed in a future release. If required, use the (privilege: advanced) "vserver
cifs options modify -vserver bdtestsvm -smb1-enabled true" to enable it.
Make sure you specify correctly the
-ouoption. In our case, the object has been created inOU=Computers,OU=ccme,DC=ccme,DC=ad, and not the “default”CN=Computers,DC=ccme,DC=ad. In case you provide a wrong configuration, you will get an error similar to:Error: Machine account creation procedure failed [ 7] Loaded the preliminary configuration. [ 9] Successfully connected to ip 10.0.1.213, port 88 using TCP [ 16] Successfully connected to ip 10.0.1.213, port 389 using TCP [ 19] Account 'NETAPP' already exists in the 'CCME.AD' domain **[ 27] FAILURE: Could not rename existing account ** 'CN=NETAPP,OU=Computers,OU=ccme,DC=ccme,DC=ad' to ** 'cn=NETAPP,cn=computers,dc=ccme,dc=ad': Insufficient ** access
For the following sections, you will need to connect to your NetApp ONTAP with SSH to the Management endpoint.
You will find its DNS in FileSystem.OntapConfiguration.Endpoints.Management.DNSName when running the aws fsx describe-file-systems command.
The default ONTAP administrator username is fsxadmin, the password is the one you have specified when creating the file system
(note: you can update it by running the aws fsx update-file-system command).
The DNSName is a private name, so you will need to first SSH on an EC2 instance in the same subnet as your ONTAP.
ec2-instance::> ssh fsxadmin@management.fs-04f9760f8c19704c2.fsx.eu-west-1.amazonaws.com
The authenticity of host 'management.fs-04f9760f8c19704c2.fsx.eu-west-1.amazonaws.com (10.0.1.111)' can't be established.
ED25519 key fingerprint is SHA256:BKYyv9474PV5Y/zySuWVtPkUdQUxWDORpIb6ydIhHwQ.
This key is not known by any other names
Are you sure you want to continue connecting (yes/no/[fingerprint])? yes
Warning: Permanently added 'management.fs-04f9760f8c19704c2.fsx.eu-west-1.amazonaws.com' (ED25519) to the list of known hosts.
(fsxadmin@management.fs-04f9760f8c19704c2.fsx.eu-west-1.amazonaws.com) Password:

This is your first recorded login.
Unsuccessful login attempts since last login: 2
Your privilege has changed since last login.
FsxId04f9760f8c19704c2::>
Note
The ONTAP shell has built-in command line completion. Just hit tab multiple times to get the available commands or parameters.
You can now check that you currently have an SVM, with a root volume, cifs and nfs configurations, and that it is joined to the Active Directory:
FsxId04f9760f8c19704c2::> vserver show
                            Admin      Operational Root
Vserver     Type    Subtype    State      State       Volume     Aggregate
----------- ------- ---------- ---------- ----------- ---------- ----------
bdtestsvm   data    default    running    running     bdtestsvm_ aggr1
                                                    root

FsxId04f9760f8c19704c2::> volume show
Vserver   Volume       Aggregate    State      Type       Size  Available Used%
--------- ------------ ------------ ---------- ---- ---------- ---------- -----
bdtestsvm bdtestsvm_root
                    aggr1        online     RW          1GB    972.5MB    0%

FsxId04f9760f8c19704c2::> volume show -fields security-style
vserver   volume         security-style
--------- -------------- --------------
bdtestsvm bdtestsvm_root unix

FsxId04f9760f8c19704c2::> vserver cifs show
            Server          Status    Domain/Workgroup Authentication
Vserver     Name            Admin     Name             Style
----------- --------------- --------- ---------------- --------------
bdtestsvm   NETAPP          up        CCME             domain

FsxId04f9760f8c19704c2::> vserver nfs show

Vserver: bdtestsvm

        General Access:  true
                    v3:  enabled
                v4.0:  enabled
                4.1:  enabled
                UDP:  enabled
                TCP:  enabled
                RDMA:  enabled
Default Windows User:  -
Default Windows Group:  -

FsxId04f9760f8c19704c2::> vserver services dns show
                                                    Name
Vserver         Domains                             Servers
--------------- ----------------------------------- ----------------
bdtestsvm       ccme.ad                             10.0.3.66,
                                                    10.0.1.213
Volume Creation
We will be using the AWS CLI to create the volume (Documentation create-volume).
We are creating a volume named vol1, with a junction path of /vol1, a security style of NTFS,
and a size of 10GB.
aws fsx create-volume \
--volume-type ONTAP \
--name vol1 \
--tags Key=Owner,Value=myuser Key=Reason,Value=netapp Key=Name,Value=myuser-netapp-vol1 \
--ontap-configuration '{"JunctionPath": "/vol1", "SecurityStyle": "NTFS", "StorageEfficiencyEnabled": true, "SizeInMegabytes": 10240, "StorageVirtualMachineId": "svm-0c5f21ca1ecced5a6", "TieringPolicy": {"Name": "AUTO", "CoolingPeriod": 31}, "OntapVolumeType": "RW", "SnapshotPolicy": "default", "CopyTagsToBackups": true}'
Expect a reply similar to:
{
    "Volume": {
        "CreationTime": "2023-10-25T11:22:35.420000+02:00",
        "FileSystemId": "fs-04f9760f8c19704c2",
        "Lifecycle": "CREATING",
        "Name": "vol1",
        "OntapConfiguration": {
            "FlexCacheEndpointType": "NONE",
            "JunctionPath": "/vol1",
            "SecurityStyle": "NTFS",
            "SizeInMegabytes": 10240,
            "StorageEfficiencyEnabled": true,
            "StorageVirtualMachineId": "svm-0c5f21ca1ecced5a6",
            "StorageVirtualMachineRoot": false,
            "TieringPolicy": {
                "CoolingPeriod": 31,
                "Name": "AUTO"
            },
            "OntapVolumeType": "RW",
            "SnapshotPolicy": "default",
            "CopyTagsToBackups": true
        },
        "ResourceARN": "arn:aws:fsx:eu-west-1:044118062099:volume/fs-04f9760f8c19704c2/fsvol-0a6ecd62d5ff20e06",
        "Tags": [
            {
                "Key": "Owner",
                "Value": "myuser"
            },
            {
                "Key": "Reason",
                "Value": "netapp"
            },
            {
                "Key": "Name",
                "Value": "myuser-netapp-vol1"
            }
        ],
        "VolumeId": "fsvol-0a6ecd62d5ff20e06",
        "VolumeType": "ONTAP"
    }
}
You can check the status of your Volume with aws fsx describe-volumes --volume-ids fsvol-0a6ecd62d5ff20e06
(documentation describe-volumes).
You will get a reply similar as the one above. Check the Lifecycle parameter (until you get a CREATED status).
Or create it through the ONTAP CLI:
FsxId04f9760f8c19704c2::> volume create -vserver bdtestsvm -volume vol1 -state online -policy default -aggregate aggr1 -size 10GB -security-style ntfs -junction-path /vol1 -tiering-policy auto
[Job 65] Job succeeded: Successful
You can also check that the volume is available in the ONTAP console:
FsxId04f9760f8c19704c2::> volume show -fields state,type,size,available,security-style,policy
vserver   volume         size state  policy                 security-style available type
--------- -------------- ---- ------ ---------------------- -------------- --------- ----
bdtestsvm bdtestsvm_root 1GB  online fsx-root-volume-policy unix           972.5MB   RW
bdtestsvm vol1           10GB online default                ntfs           9.50GB    RW
2 entries were displayed.
Note
Here we selected an NTFS security-style for our volume. This is the recommended security-style
when you want to share data between Linux and Windows instances.
In this security style, only Windows instances will be able to change the permissions of the files and directories. On Linux, you won’t be able to change the POSIX permissions, they will be set by the ACLs, security policies and GPO on the Windows side.
LDAP configuration
In order for ONTAP to map the users between the UNIX and Windows worlds, it needs to be able to recognize the users both on the NFS mounts and CIFS mounts.
A user to be able to write on a NTFS volume, it needs to be authenticated against an active directory
In order to configure LDAP, we will proceed with the following steps (the detailed process is described in How to configure LDAP in ONTAP):
Create an LDAP client configuration for the SVM.
Enable LDAP for use with the SVM.
Modify ns-switch to use LDAP.
Test LDAP lookups.
Before starting, we can check that there it no LDAP configuration, and that ns-switch
does not use LDAP for groups and users (Source files for group and passwd):
FsxId04f9760f8c19704c2::> ns-switch show
(vserver services name-service ns-switch show)
                            Source
Vserver         Database       Order
--------------- ------------   ---------
bdtestsvm       hosts          files,
                            dns
bdtestsvm       group          files
bdtestsvm       passwd         files
bdtestsvm       netgroup       files
bdtestsvm       namemap        files
5 entries were displayed.
As we have already joined ONTAP to the active directory, we already have a DNS configuration:
FsxId04f9760f8c19704c2::> vserver services dns show
                                                    Name
Vserver         Domains                             Servers
--------------- ----------------------------------- ----------------
bdtestsvm       ccme.ad                             10.0.3.66,
                                                    10.0.1.213
Create an LDAP client configuration for the SVM
The following command creates an LDAP client configuration named
ccmead on SVM bdtestsvm.
The client use the Vserver’s CIFS server credentials to bind to the Active Directory ccme.ad.
The client uses the RFC-2307 schema to make LDAP queries.
Documentation ldap client create.
Warning
You must choose the LDAP schema based on the configuration of your Active Directory.
ONTAP uses the attributes that are assigned in the configured LDAP schema on
the SVM’s LDAP client for the search. For example, in the MS-AD-BIS schema,
uid-number-attribute uses the value uidNumber, and the
posix-account-object-class value is User.
So, for numeric ID 1234, the LDAP search syntax is: (&(objectClass=User)(uidNumber=1234)).
## Option 1 - using the AD Domain configuration
## This is the recommended option, as we have already configured
## access to the AD when joining the SVM to the AD.
FsxId04f9760f8c19704c2::> vserver services ldap client create -client-config ccmead -ad-domain ccme.ad -schema RFC-2307 -vserver bdtestsvm -bind-as-cifs-server true

FsxId04f9760f8c19704c2::> vserver services ldap client show
        Client        LDAP            Active Directory              Minimum
Vserver Configuration Servers         Domain            Schema      Bind Level
------- ------------- --------------- ----------------- ----------- ----------
bdtestsvm
        ccmead        -               ccme.ad           RFC-2307    sasl

FsxId04f9760f8c19704c2::> ldap client show -client-config ccmead

                                Vserver: bdtestsvm
                Client Configuration Name: ccmead
                        LDAP Server List: -
            (DEPRECATED)-LDAP Server List: -
                Active Directory Domain: ccme.ad
    Preferred Active Directory Servers: -
        Restrict discovery to site scope: false
    Bind Using the Vserver's CIFS Credentials: true
                        Schema Template: RFC-2307
                        LDAP Server Port: 389
                    Query Timeout (sec): 3
        Minimum Bind Authentication Level: sasl
                        Bind DN (User): -
                                Base DN: DC=ccme,DC=ad
                        Base Search Scope: subtree
            Vserver Owns Configuration: true
    Use start-tls Over LDAP Connections: false
                Client Session Security: none
                    LDAP Referral Chasing: false
                        Is LDAPS Enabled: false
                    Try Channel Binding: true


## Option 2 - with LDAP servers specified
FsxId04f9760f8c19704c2::> vserver services ldap client create -client-config ccmead -ldap-servers 10.0.3.66,10.0.1.213 -schema RFC-2307 -vserver bdtestsvm -bind-dn cn=ReadOnlyUser,ou=Users,ou=ccme,dc=ccme,dc=ad -base-dn DC=ccme,DC=ad
Please enter password:
Confirm password:

FsxId04f9760f8c19704c2::> vserver services ldap client show                                                                                                                                                      Client        LDAP            Active Directory              Minimum
Vserver Configuration Servers         Domain            Schema      Bind Level
------- ------------- --------------- ----------------- ----------- ----------
bdtestsvm
        ccmead        10.0.3.66,      -                 RFC-2307    simple
                    10.0.1.213

FsxId04f9760f8c19704c2::*> ldap client show -client-config ccmead

                                Vserver: bdtestsvm
                Client Configuration Name: ccmead
                        LDAP Server List: 10.0.3.66, 10.0.1.213
            (DEPRECATED)-LDAP Server List: -
                Active Directory Domain: -
    Preferred Active Directory Servers: -
        Restrict discovery to site scope: false
Bind Using the Vserver's CIFS Credentials: false
                        Schema Template: RFC-2307
                        LDAP Server Port: 389
                    Query Timeout (sec): 3
        Minimum Bind Authentication Level: simple
                        Bind DN (User): cn=ReadOnlyUser,ou=Users,ou=ccme,dc=ccme,dc=ad
                                Base DN: DC=ccme,DC=ad
                        Base Search Scope: subtree
            Vserver Owns Configuration: true
    Use start-tls Over LDAP Connections: true
                Client Session Security: none
                    LDAP Referral Chasing: false
                        Is LDAPS Enabled: false
                    Try Channel Binding: true
Enable LDAP for use with the SVM
The following command associates the LDAP client configuration ccmead with the SVM bdtestsvm, and enables the LDAP client on the SVM.
FsxId04f9760f8c19704c2::> vserver services ldap create -vserver bdtestsvm -client-config ccmead -skip-config-validation false

Warning: "LDAP" is not present as a name service source in any of the name service databases, however, a valid LDAP configuration was found for Vserver "bdtestsvm". Either configure "LDAP" as a name
        service source using the "vserver services name-service ns-switch" command or remove the "LDAP" configuration from the Vserver "bdtestsvm" using the "vserver services name-service ldap delete"
        command.

FsxId04f9760f8c19704c2::> vserver services ldap show
            Client
Vserver        Configuration
-------------- -------------
bdtestsvm      ccmead
Modify ns-switch to use LDAP
ONTAP does not start using LDAP for name lookups until LDAP is specified in the SVM ns-switch configuration, and it uses LDAP only for the databases that are specified by the ns-switch commands.
documentation ns-switch modify
FsxId04f9760f8c19704c2::> vserver services name-service ns-switch modify -vserver bdtestsvm -database passwd -sources files ldap

FsxId04f9760f8c19704c2::> vserver services name-service ns-switch modify -vserver bdtestsvm -database group  -sources files ldap
Check the new ns-switch configuration, it must include ldap for passwd and group:
FsxId04f9760f8c19704c2::> vserver services name-service ns-switch show
                            Source
Vserver         Database       Order
--------------- ------------   ---------
bdtestsvm       hosts          files,
                            dns
bdtestsvm       group          files,
                            ldap
bdtestsvm       passwd         files,
                            ldap
bdtestsvm       netgroup       files
bdtestsvm       namemap        files
5 entries were displayed.
Check that you can query a user with the configuration, in our example testuser (following command should return its UID),
also check the group, in our example testusergrp (the following command should return its GID)
(documentation authentication translate):
FsxId04f9760f8c19704c2::> set diag

FsxId04f9760f8c19704c2::*> vserver services access-check authentication translate -node FsxId04f9760f8c19704c2-01 -vserver bdtestsvm -unix-user-name testuser
2500

FsxId04f9760f8c19704c2::*> vserver services access-check authentication translate -node FsxId04f9760f8c19704c2-01 -vserver bdtestsvm -unix-group-name testusergrp
2500
Test LDAP lookups
See the Test LDAP functionality section in
How to configure LDAP in ONTAP.
Mounting the file system
Linux instance
SSSD Configuration
Though the configuration of SSSD is out of the scope of this article, you want to ensure that
it is properly configured to connect to your Active Directory to authenticate users and get
their UID/GID from it. This means that you want to ensure that the ldap_id_mapping option is
set to False to prevent SSSD from constructing UID/GIDs from the Windows SID of the users.
Here is an example of a /etc/sssd/sssd.conf (note that any changes to this file will require to
restart the sssd service with systemctl restart sssd):
[domain/default]
cache_credentials = True
debug_level = 0x1ff
default_shell = /bin/bash
fallback_homedir = /home/%u
id_provider = ldap
ldap_auth_disable_tls_never_use_in_production = true
ldap_default_authtok = MyPassword1234!
ldap_default_bind_dn = cn=ReadOnlyUser,ou=Users,ou=ccme,dc=ccme,dc=ad
ldap_id_mapping = False
ldap_referrals = False
ldap_schema = AD
ldap_search_base = DC=ccme,DC=ad
ldap_tls_reqcert = never
ldap_uri = ldap://10.0.3.66,ldap://10.0.1.213
use_fully_qualified_names = False

[domain/local]
id_provider = local
enumerate = True

[sssd]
config_file_version = 2
services = nss, pam, ssh
domains = default, local
full_name_format = %1$s

[nss]
filter_users = nobody,root
filter_groups = nobody,root

[pam]
offline_credentials_expiration = 7
Note
With CCME, you can specify SSSD configurations in the AWS ParallelCluster configuration file.
See the AdditionalSssdConfigs
parameter in the DirectoryService configuration section to pass the correct parameters to SSSD. Here is an example:
DirectoryService:
    DomainName: ccme.ad
    DomainAddr: ldap://10.0.3.66,ldap://10.0.1.213
    PasswordSecretArn: arn:aws:secretsmanager:eu-west-1:012345678901:secret:ccme/readonlyuser_pwd-Z8W8nk
    DomainReadOnlyUser: cn=ReadOnlyUser,ou=Users,ou=ccme,dc=ccme,dc=ad
    AdditionalSssdConfigs:
        ldap_id_mapping: False
Check that you are able to query a user from the Active Directory. For example, here we query for testuser:
ec2-instance::root> getent passwd testuser
testuser:*:2500:2500:testuser testuser:/home/testuser:/bin/bash
ec2-instance::root> id testuser
uid=2500(testuser) gid=2500(testusergrp) groups=2500(testusergrp)
Mouting ONTAP with NFS
The vol1 volume can be mounted either in NFSv3 or NFSv4.
For a detailed explanation of the differences between NFSv3 and NFSv4, you can
refer to the article
NFSv3 and NFSv4: What’s the difference?.
You can also have a look at the following technical report for best pratices on
NFS in NetApp ONTAP.
To mount the vol1 volume with NFSv4:
ec2-instance::root> mkdir /ontap

ec2-instance::root> mount -v -t nfs -o vers=4.2 svm-0c5f21ca1ecced5a6.fs-04f9760f8c19704c2.fsx.eu-west-1.amazonaws.com:/vol1 /ontap
mount.nfs: timeout set for Wed Oct 25 14:52:00 2023
mount.nfs: trying text-based options 'vers=4.2,addr=10.0.1.64,clientaddr=10.0.1.104'

ec2-instance::root> mount | grep ontap
svm-0c5f21ca1ecced5a6.fs-04f9760f8c19704c2.fsx.eu-west-1.amazonaws.com:/vol1 on /ontap type nfs4 (rw,relatime,vers=4.2,rsize=65536,wsize=65536,namlen=255,hard,proto=tcp,timeo=600,retrans=2,sec=sys,clientaddr=10.0.1.104,local_lock=none,addr=10.0.1.64)
If you wish to mount vol1 with NFSv3, simply change the -o vers=4.2 parameter by -o vers=3.
On NFSv4, users are sometimes mapped to nobody when you look at the ownership of files:
[testuser@ip-10-0-1-8 ~]$ cd /ontap/
[testuser@ip-10-0-1-8 ontap]$ echo test > testfile
[testuser@ip-10-0-1-8 ontap]$ ls -l
total 0
-rwxrwxrwx 1 nobody testusergrp 5 Oct 25 17:33 testfile
If this happens, you will need to do the following changes:
on ONTAP
check the SVM’s NFS domain. Here, the domain is wrong as it shows
eu-west-1.compute.internal:FsxId04f9760f8c19704c2::*> vserver nfs show -vserver bdtestsvm -fields v4-id-domain vserver v4-id-domain --------- -------------------------- bdtestsvm eu-west-1.compute.internal
modify the SVM’s NFS domain to specify the correct domain, in our case
ccme.ad:FsxId04f9760f8c19704c2::*> vserver nfs modify -v4-id-domain ccme.ad FsxId04f9760f8c19704c2::*> vserver nfs show -vserver bdtestsvm -fields v4-id-domain vserver v4-id-domain --------- ------------ bdtestsvm ccme.ad
on the NFS client (your EC2 instance)
edit the
/etc/idmapd.conf, and replace theDomainparameter by your domain name, hereccme.adclear
nfsidmapkeyring of all the keys:nfsidmap -crestart the
nfs-idmapservice withsystemctl restart nfs-idmapdcheck that the ownership is now correct:
[testuser@ip-10-0-1-8 ~]$ ls -l /ontap
total 0
-rwxrwxrwx 1 testuser testusergrp 5 Oct 25 17:33 testfile
Warning
Do not use the mounting capability of AWS ParallelCluster for
OnTap
to mount an NTFS style volume, this will fail (it will work for UNIX style volumes).
Instead, create a custom CCME playbook that you copy in CCME/custom with a name such as install-mountnetapp-all.yaml
(see Custom Scripts). For example:
- hosts: localhost
  vars:
    fsx_mountpoint: /ontap
    fsx_svm_hostname: svm-0c5f21ca1ecced5a6.fs-04f9760f8c19704c2.fsx.eu-west-1.amazonaws.com
    fsx_volume: vol1
  tasks:
    - name: "Ensure FSxN subdirectories/mountpoints exist and have correct rights"
      file:
        path: "{{ fsx_mountpoint }}"
        state: directory
        mode: '775'

    - name: Mount FSx for Netapp ONTAP volume HOME
      ansible.posix.mount:
        path: "{{ fsx_mountpoint }}"
        src: "{{ fsx_svm_hostname }}:/{{ fsx_volume }}"
        fstype: nfs
        state: mounted
        backup: yes
        opts: vers=4.2
See the following articles for reference:
Windows instance
First of all, ensure that your Windows instance has joined the same domain as your ONTAP.
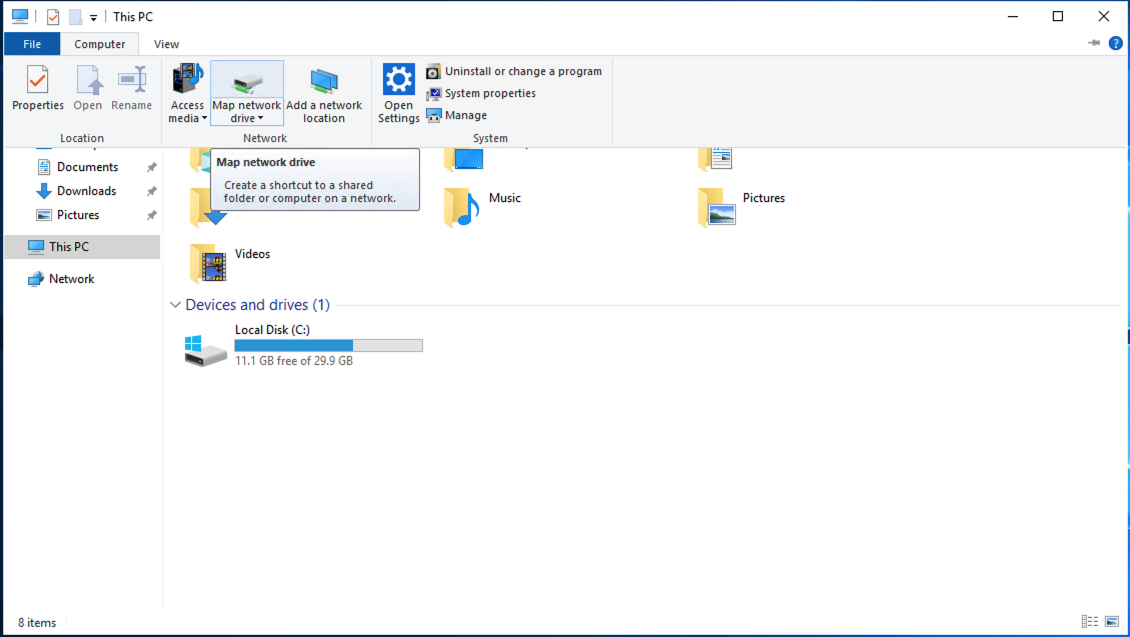
Then, to mount the file system, open File Explorer and click on This PC in the left panel, and then on Computer on the top panel.
Click then on Map a network drive
Select a Drive letter (here Z:), and specify the folder you want to mount: you need to input \\netapp\vol1,
with netapp being the NetBios name of your FSx for NetApp ONTAP, and vol1 the name of the CIFS share we created.
You can also use the IP of your NetApp, though it is always better to use the DNS name.
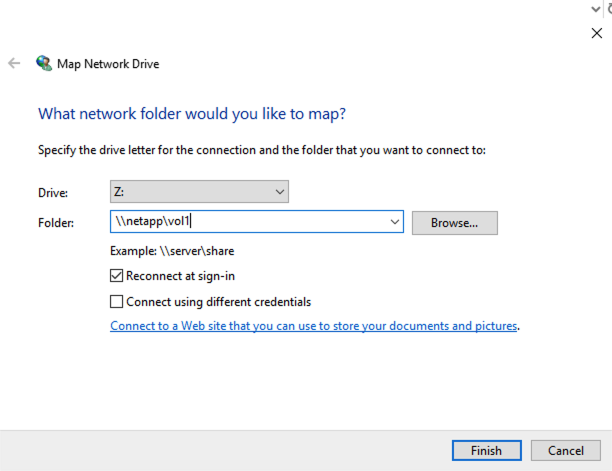
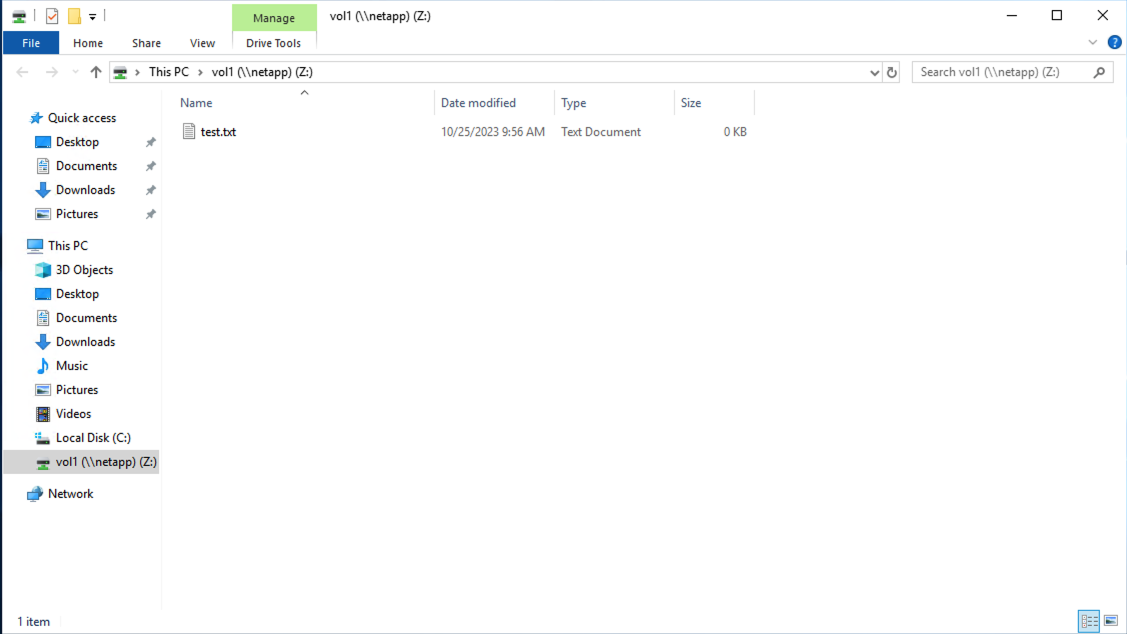
Click on Finish, you will get access to the share.
We could also have used the SMB IP address as described in the AWS Console or when running
the aws fsx describe-storage-virtual-machines --storage-virtual-machine-ids svm-0c5f21ca1ecced5a6 command
(see the StorageVirtualMachines[0].Endpoints.Smb.IpAddresses field in the response).
Mounting the network drive can also be done with Powershell
(documentation New-PSDrive).
This can be used for example in the CCME/custom/winec2_config.ps1 script that is automatically executed
when you start a new Windows DCV session with CCME (see Windows): as you’ll need to join the domain, the
instance will restart at least once to finalize the join, you will need to differ the mount after restart (see
provided example in CCME/custom/winec2_config.ps1).
New-PSDrive -Name "Z" -PSProvider "FileSystem" -Root "\\netapp\vol1" -Persist
ONTAP Ansible module
All the above configurations of ONTAP can be tedious and prone to errors if done manually. Luckily, NetApp provides fully featured ONTAP modules for Ansible. This allows an infrastructure as code approach, even for your storage. Apart from the initial FSx for NetApp ONTAP file system creation and SVM creation, the rest of the configuration can be entirely scripted and automated with Ansible. What’s more, as we use an Ansible module, every task is idempotent, so you can run your Ansible script multiple times without fear of breaking your ONTAP.
The above configuration can be automated with the following Ansible script. This script
can be used as a custom script when deploying the Management Host for example
(if the ONTAP is shared between multiple clusters) by
copying it to management/custom/install-ontap-configuration-management.yaml,
or as a custom script when deploying a cluster by copying it to
CCME/custom/install-ontap-configuration-head.yaml:
- name: Deployment of CCME on Head and Compute nodes
  gather_facts: false
  hosts: localhost
  vars:
    hostname: "management.fs-04f9760f8c19704c2.fsx.eu-west-1.amazonaws.com"
    username: "fsxadmin"
    password: "MyPassword1234!"
    vserver: bdtestsvm
    validate_certs: false
    ad_domain: ccme.ad
    ad_schema: RFC-2307
    ad_nameservers: 10.0.3.66,10.0.1.213
    ad_domain_login: Admin
    ad_domain_pwd: MyPassword1234!
    ontap_ou: OU=Computers,OU=CCME
    ontap_ad_name: NETAPP

  tasks:
    ## 1 - Install dependencies
    # Note: the netapp.ontap ansible collection is available by default in the latest versions of Ansible
    # So we don't need to install it. We just need to install a few Python dependencies
    - name: Install netapp.ontap dependencies
      ansible.builtin.pip:
        name:
          - netapp-lib
          - requests
      retries: 6
      delay: 10

    ## 2 - Configure our NETAPP ONTAP
    - name: Create cluster DNS
      netapp.ontap.na_ontap_dns:
        state: present
        domains: "{{ ad_domain }}"
        nameservers: "{{ ad_nameservers }}"
        vserver: "{{ vserver }}"
        hostname: "{{ hostname }}"
        username: "{{ username }}"
        password: "{{ password }}"
        use_rest: auto
        validate_certs: "{{ validate_certs }}"

    - name: Create cifs_server
      netapp.ontap.na_ontap_cifs_server:
        state: present
        name: "{{ ontap_ad_name }}"
        service_state: started
        domain: "{{ ad_domain }}"
        ou: "{{ ontap_ou }}"
        admin_user_name: "{{ ad_domain_login }}"
        admin_password: "{{ ad_domain_pwd }}"
        # if "force" is set and a machine account with the same
        # name as specified in "name" exists in the Active Directory,
        # it will be overwritten and reused.
        force: true
        vserver: "{{ vserver }}"
        hostname: "{{ hostname }}"
        username: "{{ username }}"
        password: "{{ password }}"
        use_rest: auto
        validate_certs: "{{ validate_certs }}"

    - name: Create an NTFS Volume
      netapp.ontap.na_ontap_volume:
        state: present
        name: vol1
        junction_path: /vol1
        volume_security_style: ntfs
        aggregate_name: aggr1
        size: 10
        size_unit: gb
        tiering_policy: auto
        wait_for_completion: true
        comment: ansible created volume
        vserver: "{{ vserver }}"
        hostname: "{{ hostname }}"
        username: "{{ username }}"
        password: "{{ password }}"
        use_rest: auto
        validate_certs: "{{ validate_certs }}"

    - name: Create CIFS share
      netapp.ontap.na_ontap_cifs:
        state: present
        name: vol1
        path: /vol1
        comment: CIFS share description
        vserver: "{{ vserver }}"
        hostname: "{{ hostname }}"
        username: "{{ username }}"
        password: "{{ password }}"
        use_rest: auto
        validate_certs: "{{ validate_certs }}"

    - name: Create LDAP client and enable it on the SVM
      netapp.ontap.na_ontap_ldap_client:
        state: present
        ad_domain: "{{ ad_domain }}"
        bind_as_cifs_server: true
        schema: "{{ ad_schema }}"
        vserver: "{{ vserver }}"
        hostname: "{{ hostname }}"
        username: "{{ username }}"
        password: "{{ password }}"
        use_rest: auto
        validate_certs: "{{ validate_certs }}"

    - name: Create name service database
      netapp.ontap.na_ontap_name_service_switch:
        state: present
        database_type: "{{ item }}"
        sources: files,ldap
        vserver: "{{ vserver }}"
        hostname: "{{ hostname }}"
        username: "{{ username }}"
        password: "{{ password }}"
        use_rest: auto
        validate_certs: "{{ validate_certs }}"
      loop:
        - group
        - passwd

    - name: Modify nfs configuration to specify v4-id-domain
      netapp.ontap.na_ontap_nfs:
        state: present
        nfsv4_id_domain: "{{ ad_domain }}"
        vserver: "{{ vserver }}"
        hostname: "{{ hostname }}"
        username: "{{ username }}"
        password: "{{ password }}"
        use_rest: auto
        validate_certs: "{{ validate_certs }}"
Note
For security reasons you shouldn’t leave your passwords in plaintext in the Ansible
script. We recommend to put it in a Secret in AWS Secret Manager, and then retrieve
it through the ARN of the secret with
"{{ lookup('amazon.aws.aws_secret', ONTAP_SECRET_ARN, region=AWS_REGION) }}"
(with ONTAP_SECRET_ARN the ARN of the Secret in AWS Secret manager, and
AWS_REGION the AWS Region in which your secret is). For example:
- name: Create cluster DNS
  netapp.ontap.na_ontap_dns:
    state: present
    domains: "{{ ad_domain }}"
    nameservers: "{{ ad_nameservers }}"
    vserver: "{{ vserver }}"
    hostname: "{{ hostname }}"
    username: "{{ username }}"
    password: "{{ lookup('amazon.aws.aws_secret', ONTAP_SECRET_ARN, region=AWS_REGION) }}"
    use_rest: auto
    validate_certs: "{{ validate_certs }}"
Troubleshooting
Checking user mapping
One of the main issues you can face when configuring multi-protocol access to ONTAP volumes, is the resolution of users IDs/username between Linux and Windows. If you have permission issues when trying to access NFS mounts on Linux, look at the following commands.
First go into diag mode (to check if you are in diag mode, you can check if a
* appears in the prompt before the > character), ONTAP will provide more detailed
information when using show commands:
FsxId04f9760f8c19704c2::> set diag

Warning: These diagnostic commands are for use by NetApp personnel only.
Do you want to continue? {y|n}: y
Check export-policy:
FsxId04f9760f8c19704c2::*> vserver export-policy rule show -policyname default -instance

                                    Vserver: bdtestsvm
                                Policy Name: default
                                Rule Index: 1
                            Access Protocol: any
List of Client Match Hostnames, IP Addresses, Netgroups, or Domains: 0.0.0.0/0
                            RO Access Rule: any
                            RW Access Rule: any
User ID To Which Anonymous Users Are Mapped: 65534
                Superuser Security Types: any
            Honor SetUID Bits in SETATTR: true
                Allow Creation of Devices: true
                NTFS Unix Security Options: fail
        Vserver NTFS Unix Security Options: use_export_policy
                    Change Ownership Mode: restricted
            Vserver Change Ownership Mode: use_export_policy
                                Policy ID: 12884901889
You may need to change the NTFS Unix Security Options if copying a file on an NFS share fails (see this KB):
FsxId04f9760f8c19704c2::*> vserver nfs modify -vserver bdtestsvm -ntfs-unix-security-ops ignore
Check user mapping unix to windows:
FsxId04f9760f8c19704c2::*> vserver services access-check name-mapping show -direction unix-win -node FsxId04f9760f8c19704c2-01 -vserver bdtestsvm -name testuser

'testuser' maps to 'ccme\testuser'
Check user authentication from vserver, if pcuser is displayed for the UNIX UID or GID, then it means
that the user is not correctly map:
# test 1: User testuser not mapped correctly, it appears as "pcuser" in UNIX UID
FsxId04f9760f8c19704c2::*> vserver services access-check authentication login-cifs -node FsxId04f9760f8c19704c2-01 -vserver bdtestsvm -user ccme\testuser

Enter the password:

UNIX UID: pcuser <> Windows User: ccme\testuser (Windows Domain User)

GID: pcuser
Supplementary GIDs:
pcuser

Primary Group SID: ccme\Domain Users (Unknown Domain group)

Windows Membership:
ccme\Domain Users (Unknown Domain group)
ccme\AWS Delegated Add Workstations To Domain Users (Windows Alias)
BUILTIN\Users (Windows Alias)
User is also a member of Everyone, Authenticated Users, and Network Users

Privileges (0x2080):
SeChangeNotifyPrivilege
Authentication Succeeded.

# test 2: User testuser mapped correctly
FsxId04f9760f8c19704c2::*> vserver services access-check authentication login-cifs -node FsxId04f9760f8c19704c2-01 -vserver bdtestsvm -user ccme\testuser

Enter the password:

UNIX UID: testuser <> Windows User: ccme\testuser (Windows Domain User)

GID: testusergrp
Supplementary GIDs:
testusergrp

Primary Group SID: ccme\Domain Users (Unknown Domain group)

Windows Membership:
ccme\Domain Users (Unknown Domain group)
ccme\testusergrp (Windows Domain group)
ccme\AWS Delegated Add Workstations To Domain Users (Windows Alias)
BUILTIN\Users (Windows Alias)
User is also a member of Everyone, Authenticated Users, and Network Users

Privileges (0x2080):
SeChangeNotifyPrivilege
Authentication Succeeded.
Verify that the UNIX account to which you are attempting to map can be found and resolved by the vserver (see this link):
FsxId04f9760f8c19704c2::*> vserver services access-check authentication translate -node FsxId04f9760f8c19704c2-01 -vserver bdtestsvm -unix-user-name unkownuser

Vserver: bdtestsvm (internal ID: 3)

Error: Acquire UNIX credentials procedure failed
[  1 ms] Entry for user-name: unkownuser not found in the current
        source: FILES. Ignoring and trying next available source
[     3] Using a cached connection to ccme.ad
**[     4] FAILURE: User 'unkownuser' not found in UNIX
**         authorization source LDAP.
[     4] Entry for user-name: unkownuser not found in the current
        source: LDAP. Entry for user-name: unkownuser not found
        in any of the available sources
[     5] Unable to retrieve UID for UNIX user unkownuser

Error: command failed: Failed to resolve user name to a UNIX ID. Reason: "SecD Error: object not found".
Wrong schema for ldap client
You need to ensure that you use the correct schema in the ldap client: in the above example we used the
RFC-2307 which searches users with (&(objectClass=posixAccount)(uid=<username>)), while MS-AD-BIS searches
users with (&(objectClass=user)(uid=<username>)).
If an incorrect schema is specified, queries fail because incorrect attributes are passed to the LDAP server.
Timeout while querying LDAP
Another issue you can face if your Active Directory has a lot of objects, is that LDAP queries can take
a long time, longer than the default 3 seconds timeout. If this happens, you will get a timeout
error when running the following command (with validuser a user correctly configured in the AD):
FsxId04f9760f8c19704c2::*> vserver services access-check authentication translate -node FsxId04f9760f8c19704c2-01 -vserver bdtestsvm -unix-user-name validuser
If this happens you can do the following configurations to fix this:
Increase the ldap queries timeout (between 1 and 10 seconds), here we set it to 10 seconds:
FsxId04f9760f8c19704c2::*> vserver services name-service ldap client modify -vserver bdtestsvm -client-config ccmead -query-timeout 10
Limit the AD tree in which the requests are done to find the users (here in the
OU=S001,DC=ccme,DC=adsubtree):FsxId04f9760f8c19704c2::*> vserver services name-service ldap client modify -vserver bdtestsvm -user-dn OU=S001,DC=ccme,DC=ad -client-config ccmead
With the same command, you can also restrict the tree in which groups are searched with the
-group-dnoption and-group-membership-filteroption to specify the custom LDAP search filter to be used when looking up group membership.